Many engineers run into trouble because the restore path differs based on whether you're recovering an OS disk or a data disk, which tool you're using (Portal, CLI, or PowerShell), and whether your snapshot is in the same region as your target. A missed permission or a region mismatch can leave you with a failed deployment or, worse, an inaccessible VM.
This guide covers the prerequisites, a step-by-step walkthrough using the Azure Portal (with CLI equivalents), the key variables that determine restore outcomes, common failure points, and when snapshots are actually the right tool for the job.
Key Takeaways
- Disks cannot be reverted in place — restore means creating a new managed disk from the snapshot first
- OS disk restores require the VM to support a disk swap; data disk restores are generally less disruptive
- At minimum, Contributor or Disk Restore Operator role on the target resource group is required before starting
- Cross-region restore requires copying the incremental snapshot to the target region first
- For long-term, policy-driven retention, Azure Backup is a better fit than snapshots
What You Need Before Restoring an Azure Managed Disk Snapshot
Preparation determines whether a restore succeeds or fails. Missing a permission or working from a snapshot in the wrong region will cause validation errors before you even create the new disk.
Required Permissions and Access
The identity initiating the restore needs at minimum the Contributor or Disk Restore Operator role on the target resource group. The Disk Restore Operator role specifically grants a Backup vault's managed identity permission to perform disk restores.
If you're restoring a disk managed through Azure Backup, also verify the Backup vault's managed identity hasn't had its role assignments revoked on the snapshot resource group — Azure's restore documentation confirms this is a common cause of restore failures.
Allow up to 10 minutes for new role assignments to propagate before triggering a restore.
Snapshot and Disk Readiness Checks
Before creating the restored disk, confirm:
- Provisioning state is "Succeeded" — check in the Azure Portal under Snapshots, or run
az snapshot list --resource-group <rg> - Snapshot region matches the target region — by default, a new disk must be created in the same region as the snapshot
- Disk size compatibility — the restored disk size can stay the same or increase; it cannot be smaller than the source snapshot
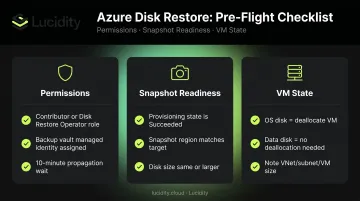
VM State Considerations
Deallocation requirements depend on what you're restoring:
- OS disk restores: Azure supports swaps on running VMs in some configurations, but stopping and deallocating the VM is the safer approach
- Data disk restores (attaching as a secondary): deallocation is not required
Note key VM configuration details before you start: resource group, virtual network, subnet, and VM size. If you're spinning up a new VM from the snapshot rather than swapping into an existing one, those settings determine connectivity.
How to Restore an Azure Managed Disk Snapshot (Step-by-Step)
The steps below use the Azure Portal. Where relevant, CLI equivalents are included for teams working in scripted or automated environments.
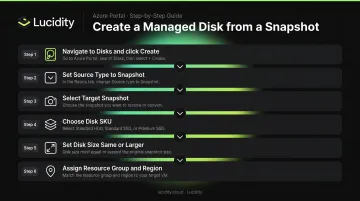
Step 1: Create a New Managed Disk from the Snapshot
According to Microsoft, restoring a snapshot always starts by creating a new managed disk — you cannot revert a disk in place.
In the Azure Portal:
- Navigate to Disks → + Create
- Set Source Type to Snapshot
- Select your target snapshot
- Choose the appropriate disk SKU (Standard HDD, Standard SSD, Premium SSD, or Ultra Disk)
- Set the disk size (same or larger than the snapshot)
- Assign the correct resource group and region
CLI equivalent:
az disk create \
  --resource-group <rg> \
  --name <new-disk-name> \
  --source <snapshot-name-or-id> \
  --sku Premium_LRS \
  --location <region>
One useful option here: you can upgrade the disk SKU during restore. Restoring from Standard HDD to Premium SSD is fully supported. What you cannot do is reduce disk size — Microsoft confirms shrinking a managed disk is not supported.
Step 2: Swap the OS Disk or Attach the Data Disk
For OS disk restores, navigate to the VM → Disks → Swap OS disk, then select the newly created managed disk.
CLI equivalent for OS disk swap:
az vm update \
  --resource-group <rg> \
  --name <vm-name> \
  --os-disk <restored-disk-id>
If you're restoring a data disk rather than the OS disk, go to VM → Disks → Attach existing disk, select the restored disk, and assign a LUN.
CLI equivalent for data disk attach:
az vm disk attach \
  --resource-group <rg> \
  --vm-name <vm-name> \
  --name <restored-disk-name>
Step 3: Start the VM and Verify
Start the VM from the portal or via az vm start --name <vm-name> --resource-group <rg>.
Post-restore checks to run immediately:
- Confirm the VM boots and the expected OS state is present (OS disk restores)
- Bring the data volume online manually if needed — use Disk Management on Windows or
mounton Linux (data disk restores) - Verify VM extensions are active; they may not auto-enable after a restore
- Reassign RBAC roles manually — role assignments scoped to the original VM do not carry over to new resources
- Confirm the VM is reachable on the expected subnet
Key Factors That Affect Snapshot Restore Success
Understanding these variables prevents the most common restore failures.
Incremental vs. Full Snapshots
Microsoft's incremental snapshot documentation clarifies an important point: each incremental snapshot contains enough information to reconstruct the full disk at that point in time. Deleting intermediate incremental snapshots does not break the ability to restore from later ones — each is self-sufficient.
Full snapshots are self-contained copies and carry no dependency on prior snapshots, making them straightforward for long-term archival restores. Incremental snapshots are more storage-efficient since they only store changes, and they're billed based on used size rather than provisioned capacity.
Cross-Region Restore
A snapshot can only create a disk in the same region by default. Cross-region restore requires copying the incremental snapshot to the target region first:
az snapshot create \
  -g <target-rg> \
  -n <target-snapshot-name> \
  -l <target-region> \
  --source <source-snapshot-id> \
  --incremental \
  --copy-start
Critical limitation: Only incremental snapshots support cross-region copy. Full snapshots cannot be copied across regions using this method.
Disk SKU and Performance Impact
The SKU you select for the restored disk determines its IOPS and throughput ceiling. Per Microsoft's published performance targets:
| SKU | Max IOPS | Max Throughput |
|---|---|---|
| Standard HDD (S4–S50) | 500 | 60 MB/s |
| Standard SSD (E1–E50) | 500 | 100 MB/s |
| Standard SSD (E70) | 4,000 | 600 MB/s |
| Premium SSD (P80) | 20,000 | 900 MB/s |
| Premium SSD v2 | 80,000 | 1,200 MB/s |
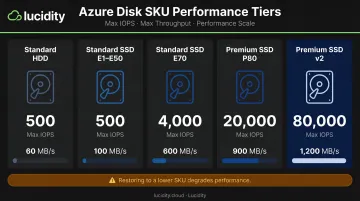
Restoring to a lower-performance SKU than the original will degrade application performance. It's an easy misconfiguration to miss when restoring under pressure.
Snapshot Storage Costs
Snapshots accumulate quickly, especially without a clear retention policy. Azure bills snapshots based on used size rather than provisioned disk capacity, so incremental snapshots are more cost-effective for ongoing use. Even so, orphaned snapshots attached to decommissioned or idle disks still generate charges — and those charges rarely show up clearly in native Azure dashboards.
That's where visibility tooling helps. Lucidity's Lumen surfaces idle disk patterns across Azure environments, identifying unattached, unmounted, zero-I/O, and reserved disks. Teams can see exactly where snapshot and disk spend is accumulating before it becomes a significant budget line.
Common Mistakes and How to Troubleshoot Them
Most restore failures trace back to skipped preparation steps, not platform bugs.
Insufficient RBAC Permissions
The initiating identity lacks the Contributor or Disk Restore Operator role, or the Backup vault's managed identity has had its permissions revoked on the snapshot resource group.
- Go to the target resource group → Access Control (IAM) → add the required role
- Wait up to 10 minutes for propagation before retrying — RBAC changes don't apply instantly
VM Fails to Boot After OS Disk Swap
The snapshot was taken under active write load (crash-consistent), leaving the OS in an inconsistent state. Selecting the wrong snapshot produces the same result.
- Use application-consistent snapshots for OS disk recovery whenever possible
- If the VM is unbootable, attach the OS disk as a data disk to a repair VM to access and fix files
- Use Azure Serial Console for low-level access when the network is unavailable
Restore Validation Fails or Disk Appears in Wrong Region
A region mismatch between the snapshot and target disk — or a naming conflict with an existing disk in the target resource group — triggers this error.
- Confirm the snapshot's region:
az snapshot show --name <snapshot> --resource-group <rg> - Rename or delete the conflicting disk before retrying
- Complete any cross-region copy operation fully before initiating restore
When to Use Snapshot Restore vs. Other Azure Recovery Methods
Snapshots are not always the right tool — and choosing the wrong recovery method can extend downtime or create compliance gaps.
Use snapshot restore when:
- Rolling back a failed patch, configuration change, or test deployment
- Creating a test environment from production data
- Migrating a disk between regions or subscriptions
- You need self-service, low-latency recovery without a Recovery Services vault
Use Azure Backup (Recovery Services Vault) when:
- You need long-term retention, policy-driven schedules, or compliance reporting
- Your workloads include SQL Server VMs, domain controllers, or encrypted VMs — Azure Backup provides application-consistent recovery that snapshots cannot reliably deliver
- You need cross-region restore at scale with centralized management
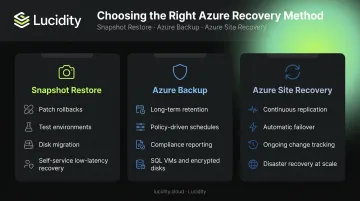
Use Azure Site Recovery when:
- Your goal is continuous replication and automatic failover for disaster recovery
- Snapshots capture a single point in time; Site Recovery handles ongoing changes through continuous replication
Frequently Asked Questions
Can you restore an Azure managed disk snapshot to a different region?
Not directly. Snapshots create disks in the same region by default. Cross-region restore requires copying the incremental snapshot to the target region first using the --copy-start flag — only incremental snapshots support this; full snapshots cannot be copied this way.
What is the difference between restoring a snapshot and using Azure Backup?
Snapshots are self-managed point-in-time copies suited for short-term recovery and disk migration. Azure Backup provides centralized, policy-driven backup with long-term retention, compliance reporting, and application-consistent recovery, particularly for SQL VMs, domain controllers, and encrypted disks.
Can you restore a snapshot without stopping the VM?
For data disk restores, stopping the VM is typically not required. For OS disk restores, Azure does support swapping on running VMs in some configurations, but deallocating the VM first is the more reliable approach and reduces the risk of errors.
How long does it take to restore an Azure managed disk from a snapshot?
Restore time varies by disk size and SKU; smaller disks under 128 GB typically complete within minutes. Microsoft does not publish fixed SLA benchmarks by disk size, so check the restore operation status in the portal for real-time progress and estimates.
What happens to the original disk after restoring from a snapshot?
The original disk is not deleted. Both the source disk and the newly restored disk coexist in your resource group. The original disk continues to incur storage charges until you manually detach and delete it.
Are incremental snapshots safe to restore from?
Yes. Deleting intermediate incremental snapshots does not affect the ability to restore from later ones. Each incremental snapshot contains enough data to reconstruct the full disk at that point in time, independently of the chain.