This guide walks through the exact commands, the parameters that matter, and the mistakes worth avoiding before you run anything in production.
Key Takeaways
- Three cmdlets do the work:
Get-AzSnapshot,New-AzDiskConfig, andNew-AzDisk - The target disk must be in the same region as the source snapshot — no exceptions
- Disk size must be equal to or larger than the source VHD size
- A background copy starts automatically — Ultra Disk and Premium SSD v2 must reach
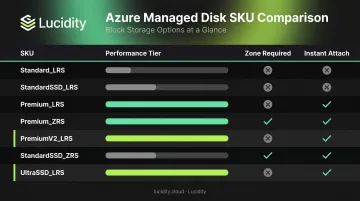
CompletionPercent = 100before attaching PremiumV2_LRSandUltraSSD_LRSrequire the-Zoneparameter- Prerequisites: Az PowerShell module,
Connect-AzAccount, and Disk Contributor (or Contributor) RBAC role
Prerequisites: What You Need Before Running the Script
Getting the environment right before scripting prevents failed deployments mid-execution. This matters most during incident recovery, when a broken script is the last thing you need.
Environment and Tooling
Install the Az PowerShell module if you haven't already:
Install-Module -Name Az -Repository PSGallery -Force
Azure Cloud Shell works as an alternative — it comes pre-configured with the Az module and requires no local setup.
Once installed, authenticate and set your subscription context:
Connect-AzAccount
Set-AzContext -SubscriptionId "<your-subscription-id>"
With authentication confirmed, verify your permissions and snapshot status before proceeding.
Permissions and Snapshot Readiness
- You need at minimum the Disk Contributor or Contributor RBAC role on the target resource group
- The source snapshot must exist and show a
provisioningStateofSucceeded - For Premium SSD v2 or Ultra Disk snapshots: verify
CompletionPercenthas reached100before proceeding — creating a disk from an incomplete snapshot will produce an unusable result
Information to Collect Before You Start
| Variable | What to gather |
|---|---|
$subscriptionId |
Your Azure subscription ID |
$resourceGroupName |
Resource group containing the snapshot |
$snapshotName |
Exact name of the source snapshot |
$diskName |
Name to assign to the new managed disk |
$location |
Azure region — must match the snapshot's region |
How to Create an Azure Managed Disk from a Snapshot Using PowerShell
The full workflow is five sequential steps — order matters.
Step 1: Set Variables and Subscription Context
Define all variables upfront, then set the subscription context:
$subscriptionId    = "<your-subscription-id>"
$resourceGroupName = "<resource-group-name>"
$snapshotName      = "<snapshot-name>"
$diskName          = "<new-disk-name>"
$storageType       = "Premium_LRS"
$zone              = "1"  # Required for PremiumV2_LRS and UltraSSD_LRS

Set-AzContext -SubscriptionId $subscriptionId
Step 2: Retrieve the Snapshot Object
$snapshot = Get-AzSnapshot `
    -ResourceGroupName $resourceGroupName `
    -SnapshotName $snapshotName
This isn't just a lookup. The $snapshot object carries .Id, .Location, and .DiskSizeGB — all three are used in the next step. Don't skip storing the result.
Step 3: Define the Disk Configuration
$diskConfig = New-AzDiskConfig `
    -SkuName $storageType `
    -Location $snapshot.Location `
    -CreateOption Copy `
    -SourceResourceId $snapshot.Id `
    -DiskSizeGB $snapshot.DiskSizeGB `
    -Zone $zone
Key points:
-Locationis set directly from$snapshot.Location— this prevents region mismatch errors-DiskSizeGBuses the snapshot's value as the floor; you can increase it, never decrease it-Zoneis only required forPremiumV2_LRSandUltraSSD_LRS— remove it for other SKUs
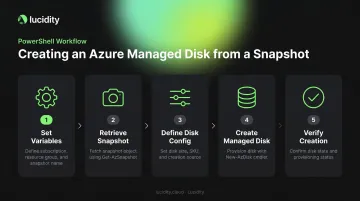
Step 4: Create the Managed Disk
New-AzDisk `
    -Disk $diskConfig `
    -ResourceGroupName $resourceGroupName `
    -DiskName $diskName
This initiates disk creation and begins a background copy process. Attachability depends on the SKU:
- Standard HDD, Standard SSD, Premium SSD: Immediately attachable, though some read latency may occur during hydration
- Ultra Disk and Premium SSD v2: Wait for the copy to complete before attaching to production workloads
Step 5: Verify the Disk Was Created Successfully
Get-AzDisk `
    -ResourceGroupName $resourceGroupName `
    -DiskName $diskName
Confirm ProvisioningState shows Succeeded. Once verified, you can attach the disk as:
- Attached as an OS disk to a new VM using
New-AzVMConfig+Set-AzVMOSDisk - Attached as a data disk to an existing VM using
Add-AzVMDataDisk+Update-AzVM
Key Parameters That Affect the Output Disk
The parameters passed to New-AzDiskConfig directly determine the performance, cost, and compatibility of the resulting disk. Misconfiguring them leads to provisioning errors, unexpected performance caps, or disks that won't attach to the target VM.
-SkuName (Storage Type)
Accepted values: Standard_LRS, Premium_LRS, StandardSSD_LRS, PremiumV2_LRS, UltraSSD_LRS, Premium_ZRS, StandardSSD_ZRS
The SKU you select sets the disk's performance ceiling permanently — at least until you convert it later. A few practical rules:
- Choosing a lower-tier SKU than the source (e.g.,
Standard_LRSfrom a Premium source) permanently reduces available IOPS and throughput for that disk - Upgrading SKU is allowed but increases cost — check the Azure Managed Disks pricing page for current rates, which vary by region
PremiumV2_LRSandUltraSSD_LRSrequire-Zoneto be specified
-DiskSizeGB
Beyond SKU, disk size is the next constraint to get right. The target size must be equal to or greater than the source VHD size in the snapshot — using $snapshot.DiskSizeGB as the value is the safest starting point.
If you create a disk larger than the source, the additional capacity exists at the Azure layer but the guest OS partition won't automatically expand. You'll need disk management tools inside the VM to extend the partition.
-Location
One hard rule: the managed disk must be created in the same region as the snapshot. There's no workaround at the disk creation step.
For cross-region DR, copy the incremental snapshot to the target region first, then run this script against the copied snapshot.
-CreateOption and -SourceResourceId
-CreateOption must be Copy when creating from a snapshot. -SourceResourceId must reference the snapshot's full ARM resource ID — which is why storing the $snapshot object matters. If the snapshot has been deleted or the ID is stale, the disk creation will fail. Verify the ID is current by running Get-AzSnapshot -SnapshotName "<name>" -ResourceGroupName "<rg>" before executing the disk creation command.
Common Mistakes and How to Troubleshoot Them
Most errors in this workflow repeat the same patterns. Here are the four that come up most often.
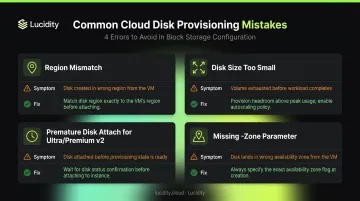
Mistake: Region mismatch between snapshot and disk
- Symptom:
New-AzDiskfails with a location conflict error - Fix: Run
$snapshot.Locationto get the exact region string, then set-Locationto that value — don't type it manually
Mistake: Disk size smaller than the source
- Symptom: Error stating the disk size must be greater than or equal to the source size
- Fix: Use
$snapshot.DiskSizeGBas your$diskSizevalue; increase it if needed but never go below it
Mistake: Attaching disk before hydration completes (Ultra Disk / Premium SSD v2 only)
- Symptom: Disk attaches, but the VM shows elevated latency, degraded IOPS, and reduced throughput
- Cause: Background hydration is still active;
CompletionPercentis below 100 - Fix: Poll
CompletionPercentusingGet-AzSnapshotand hold off attaching to production workloads until it returns100
Mistake: Missing -Zone for Premium SSD v2 or Ultra Disk
- Symptom: Deployment fails with a SKU incompatibility or zone requirement error
- Fix: Add
-Zone $zonetoNew-AzDiskConfig; confirm the zone exists in the target region before running
A Note on Scale
These fixes handle individual failures cleanly. At scale — managing dozens or hundreds of disks across multiple subscriptions — a different operational layer comes into play: tracking which disks came from which snapshots, spotting orphaned copies, and catching over-provisioned restores before they compound into wasted spend. Lucidity's Lumen maps your full Azure managed disk estate and identifies the four categories of idle disks — unattached, reserved, unmounted, and zero-I/O — that pile up after bulk recovery or environment cloning. For teams where snapshot-based workflows are part of DR or environment promotion at scale, that kind of ongoing visibility prevents the troubleshooting list above from growing longer over time.
Alternatives to PowerShell for Creating Managed Disks from Snapshots
PowerShell isn't the only path. The right tool depends on your team's workflow and automation requirements.
Azure Portal
Best for one-off disk creation or teams without scripting experience. Navigate to the snapshot resource and use the Create Disk option directly — no code required.
Limitation: Every parameter requires manual entry. That makes it unsuitable for bulk operations or CI/CD pipelines.
Azure CLI
A natural fit for Linux/macOS environments or Bash-based automation pipelines:
az disk create \
  --resource-group <rg> \
  --name <diskName> \
  --source <snapshotId>
Worth noting: This is functionally equivalent to the PowerShell approach. Both are valid for production use — syntax preference typically drives the choice.
ARM Templates / Bicep
Best when disk creation is part of a larger infrastructure-as-code deployment. Define the disk resource with creationData.createOption: 'Copy' and reference the snapshot sourceResourceId declaratively.
Trade-off: Setup takes more upfront effort, but the result is version-controlled and fully repeatable — a strong fit for teams already invested in IaC practices.
Frequently Asked Questions
Can I create a managed disk in a different region than the snapshot?
No — Azure requires the disk and snapshot to be in the same region. To create a disk in a different region, first copy the incremental snapshot to the target region, then run the disk creation script from the copied snapshot.
What is the difference between incremental and full snapshots as a source?
Both work as source inputs for New-AzDisk. Incremental snapshots store only changed blocks on Standard HDD storage (making them cheaper), while full snapshots default to standard managed disk storage. The PowerShell creation process is identical for both.
Can I specify a smaller disk size than the original?
No. Azure enforces that the target disk size must be equal to or greater than the source VHD size captured in the snapshot. Specifying a smaller value will cause the creation command to fail with an error.
Does creating a managed disk from a snapshot delete or modify the snapshot?
Snapshots are read-only and are not modified by disk creation. The same snapshot can be used to create multiple disks (up to 15 concurrently from all instant access snapshots of an individual disk). Snapshots must be explicitly deleted separately when no longer needed.
Can I change the storage type (SKU) when creating a disk from a snapshot?
Yes. -SkuName in New-AzDiskConfig accepts any supported SKU regardless of the original disk's type. The exception: UltraSSD_LRS and PremiumV2_LRS require an availability zone specified via -Zone.
How long does the background copy process take after creating a managed disk?
For Standard HDD, Standard SSD, and Premium SSD, the copy runs silently and the disk is usable immediately, though read latency may occur during the process. For Ultra Disk and Premium SSD v2, monitor CompletionPercent via Get-AzSnapshot. The disk isn't fully performant until it reaches 100, and duration varies based on disk size.