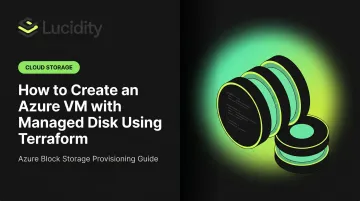
This guide walks through a complete 5-step Terraform workflow for provisioning an Azure Linux VM with an attached managed disk. Along the way, it covers the key parameters that shape disk behavior, the mistakes teams make most often, and how to troubleshoot the issues that appear after terraform apply.
Key Takeaways
- Three core resources:
azurerm_linux_virtual_machine,azurerm_managed_disk, andazurerm_virtual_machine_data_disk_attachment - Four parameters that most commonly cause issues:
storage_account_type,caching,lun, anddisk_size_gb - Use
for_each(notcount) for multi-disk configurations —countcauses full disk replacement when the list changes - After
terraform apply, the disk attaches at the hypervisor level — partitioning and mounting inside the guest OS is still manual - Managed disks are independent Azure resources with a lifecycle separate from the VM
What You Need Before Getting Started
Getting your tooling and permissions right upfront prevents failed applies, mid-deployment errors, and state drift. Here's what to verify before writing your first resource block.
Provider and Tooling Requirements
- Terraform with AzureRM provider pinned to
>= 4.53.0— required if you need live disk resize without downtime (feature added 2025-11-14) - Azure CLI for local auth via
az login, or set service principal env vars:ARM_CLIENT_ID,ARM_CLIENT_SECRET,ARM_SUBSCRIPTION_ID, andARM_TENANT_ID - Active Azure subscription with Contributor or Virtual Machine Contributor role on the target resource group
Azure Resource Prerequisites
These platform constraints will block deployment if missed:
- The VM and managed disk must be in the same Azure region — enforced by Azure, not Terraform
- If deploying into an existing VNet, the subnet ID must be known before the VM resource block is written (use a
datasource to look it up) - Ultra Disk and Premium SSD v2 have additional constraints: Ultra Disk doesn't support availability sets or disk caching; Premium SSD v2 can only be used as a data disk (not OS disk) and, in regions with availability zones, can only attach to zonal VMs
Terraform State Considerations
- Configure a remote backend (Azure Blob Storage) before applying to any production environment
- Add
lifecycle { prevent_destroy = true }to critical data disk resources — this prevents accidental deletion during module refactoring or resource renaming
How to Create an Azure VM with Managed Disk Using Terraform
The workflow follows five sequential resource declarations covering seven logical layers: Provider → Resource Group → Networking → VM → Disk → Attachment → Filesystem. Terraform resolves the dependency order automatically. All five steps together produce a self-contained, runnable configuration.
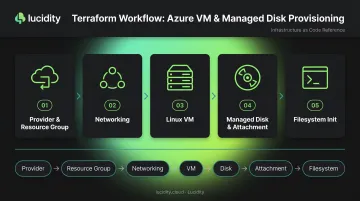
Step 1: Configure the AzureRM Provider and Resource Group
terraform {
  required_providers {
    azurerm = {
      source  = "hashicorp/azurerm"
      version = ">= 4.53.0"
    }
  }
}

provider "azurerm" {
  features {}
}

resource "azurerm_resource_group" "example" {
  name     = "rg-vm-example"
  location = "East US"
}
Pin the provider version explicitly. Disk-related features have been added incrementally (live resize support for Ultra Disk and Premium SSD v2, for example, only landed in v4.53.0). Unpinned providers can drift and break existing configurations on terraform init.
Run az login (or export service principal variables) before terraform init.
Step 2: Define Networking for the VM
resource "azurerm_virtual_network" "example" {
  name                = "vnet-example"
  address_space       = ["10.0.0.0/16"]
  location            = azurerm_resource_group.example.location
  resource_group_name = azurerm_resource_group.example.name
}

resource "azurerm_subnet" "example" {
  name                 = "subnet-example"
  resource_group_name  = azurerm_resource_group.example.name
  virtual_network_name = azurerm_virtual_network.example.name
  address_prefixes     = ["10.0.1.0/24"]
}

resource "azurerm_network_interface" "example" {
  name                = "nic-example"
  location            = azurerm_resource_group.example.location
  resource_group_name = azurerm_resource_group.example.name

  ip_configuration {
    name                          = "internal"
    subnet_id                     = azurerm_subnet.example.id
    private_ip_address_allocation = "Dynamic"
  }
}
If you're attaching to an existing VNet, skip this step and use a data "azurerm_subnet" source to retrieve the subnet ID instead.
Step 3: Declare the Azure Linux VM
resource "azurerm_linux_virtual_machine" "example" {
  name                = "vm-example"
  resource_group_name = azurerm_resource_group.example.name
  location            = azurerm_resource_group.example.location
  size                = "Standard_D2s_v3"
  admin_username      = "adminuser"

  disable_password_authentication = true

  network_interface_ids = [azurerm_network_interface.example.id]

  admin_ssh_key {
    username   = "adminuser"
    public_key = file("~/.ssh/id_rsa.pub")
  }

  os_disk {
    caching              = "ReadWrite"
    storage_account_type = "Premium_LRS"
  }

  source_image_reference {
    publisher = "Canonical"
    offer     = "0001-com-ubuntu-server-jammy"
    sku       = "22_04-lts"
    version   = "latest"
  }
}
The OS disk is defined inline within the VM resource block and managed automatically by Azure. It does not require a standalone azurerm_managed_disk resource. Use disable_password_authentication = true with SSH key authentication for all Linux VMs.
Step 4: Create the Managed Disk and Attach It to the VM
resource "azurerm_managed_disk" "data" {
  name                 = "disk-data-example"
  location             = azurerm_resource_group.example.location
  resource_group_name  = azurerm_resource_group.example.name
  storage_account_type = "Premium_LRS"
  create_option        = "Empty"
  disk_size_gb         = 128

  lifecycle {
    prevent_destroy = true
  }
}

resource "azurerm_virtual_machine_data_disk_attachment" "data" {
  managed_disk_id    = azurerm_managed_disk.data.id
  virtual_machine_id = azurerm_linux_virtual_machine.example.id
  lun                = 10
  caching            = "ReadOnly"
}
The attachment resource creates an explicit dependency: Terraform always creates the disk before the attachment, and destroys the attachment before the disk.
For multiple disks, use for_each with a named map:
variable "data_disks" {
  type = map(object({
    size_gb              = number
    storage_account_type = string
    lun                  = number
    caching              = string
  }))
  default = {
    "disk-app" = { size_gb = 128, storage_account_type = "Premium_LRS", lun = 10, caching = "ReadOnly" }
    "disk-log" = { size_gb = 64,  storage_account_type = "StandardSSD_LRS", lun = 11, caching = "None" }
  }
}

resource "azurerm_managed_disk" "data" {
  for_each             = var.data_disks
  name                 = each.key
  location             = azurerm_resource_group.example.location
  resource_group_name  = azurerm_resource_group.example.name
  storage_account_type = each.value.storage_account_type
  create_option        = "Empty"
  disk_size_gb         = each.value.size_gb
}

resource "azurerm_virtual_machine_data_disk_attachment" "data" {
  for_each           = var.data_disks
  managed_disk_id    = azurerm_managed_disk.data[each.key].id
  virtual_machine_id = azurerm_linux_virtual_machine.example.id
  lun                = each.value.lun
  caching            = each.value.caching
}
Step 5: Initialize the Filesystem Inside the VM
After terraform apply, the disk is visible inside the VM (typically as /dev/sdc) but has no partition table or filesystem. You need to create both.
resource "null_resource" "disk_init" {
  depends_on = [azurerm_virtual_machine_data_disk_attachment.data]

  connection {
    type        = "ssh"
    user        = "adminuser"
    private_key = file("~/.ssh/id_rsa")
    host        = azurerm_linux_virtual_machine.example.public_ip_address
  }

  provisioner "remote-exec" {
    inline = [
      "sudo parted /dev/sdc --script mklabel gpt mkpart primary ext4 0% 100%",
      "sudo mkfs.ext4 /dev/sdc1",
      "sudo mkdir -p /mnt/data",
      "sudo mount /dev/sdc1 /mnt/data",
      "echo '/dev/sdc1 /mnt/data ext4 defaults,nofail 0 2' | sudo tee -a /etc/fstab"
    ]
  }
}
For production workloads, prefer cloud-init or Ansible over remote-exec. Provisioners run once and aren't idempotent. If one fails partway through, Terraform won't retry cleanly — cloud-init handles that properly.
Key Parameters That Affect Your Managed Disk Configuration
Misconfiguring these four parameters is behind the majority of performance problems, cost overruns, and failed Terraform applies.
storage_account_type — Disk Tier
This field controls the entire performance profile. The five primary LRS options and their workload fit:
| Type | Use Case | Max IOPS | Max Throughput |
|---|---|---|---|
Standard_LRS |
Backups, dev/test, archives | 3,000 | 500 MB/s |
StandardSSD_LRS |
Web servers, light enterprise apps | 6,000 | 750 MB/s |
Premium_LRS |
Production, performance-sensitive | 20,000 | 900 MB/s |
PremiumV2_LRS |
High IOPS, tunable | 80,000 | 2,000 MB/s |
UltraSSD_LRS |
SAP HANA, top-tier databases | 400,000 | 10,000 MB/s |
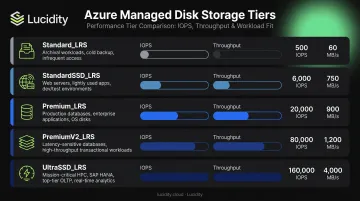
Source: Azure managed disk types, updated 2026-05-29
Only PremiumV2_LRS and UltraSSD_LRS support independent IOPS/throughput tuning via disk_iops_read_write and disk_mbps_read_write.
caching — Host-Level Read/Write Cache
Set on azurerm_virtual_machine_data_disk_attachment. The three options behave very differently:
ReadOnly— best for read-heavy data files; improves read performance by caching on the hostReadWrite— writes are acknowledged after reaching the host cache, then flushed to disk; never use this for transaction log disksNone— safest default for write-heavy or transactional workloads; no risk of durability gaps
Microsoft's SQL Server storage guidance explicitly recommends None for transaction log disks and ReadOnly for data file disks. Using ReadWrite on a WAL or redo log disk can break durability guarantees on unexpected VM shutdown.
disk_size_gb — Performance Scales With Size on Premium SSD
For Premium_LRS, performance is tier-based — larger disks get higher provisioned IOPS allocations. A P10 (128 GiB) delivers 500 IOPS and 100 MB/s; a P30 (1,024 GiB) delivers 5,000 base IOPS and 200 MB/s base throughput.
Teams frequently provision 1 TB disks just to reach a higher performance tier, leaving most of the allocated capacity unused. At scale, tracking which disks are over-provisioned this way becomes impossible to do manually.
Lucidity's Lumen product surfaces this pattern — it continuously scores every disk's tier against actual usage (IOPS, throughput, latency) and flags disks where a tier downgrade would cut costs without impacting workload performance. For disks consistently running below capacity, Lucidity AutoScaler can autonomously shrink them without downtime.
lun — Logical Unit Number
The LUN is the identifier that maps an Azure disk to a specific device path inside the guest OS. Two rules:
- Each LUN must be unique per VM
- Always assign LUNs explicitly and treat them as immutable — changing a LUN after first apply forces Terraform to destroy and recreate the attachment resource
If cloud-init or /etc/fstab references a device path derived from LUN order, an unexpected LUN change breaks mounts silently.
Common Mistakes When Provisioning Azure VMs with Managed Disks in Terraform
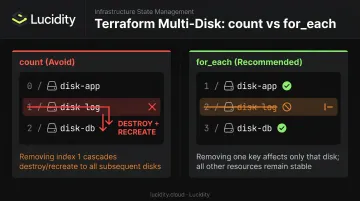
Using count Instead of for_each for Multi-Disk Configurations
count indexes disks numerically. Remove or reorder one disk in the list, and Terraform recalculates all indexes, destroying and recreating every disk after the removed entry. for_each with a named map treats each disk as an independent object with a stable key. Removing one disk from the map only affects that disk.
Misconfiguring the Caching Mode
Setting ReadWrite caching on write-heavy or transactional disks causes data consistency issues and unnecessary I/O overhead. If you don't know the workload profile, default to None rather than ReadWrite.
Quick reference:
ReadOnly— safe for read-heavy workloads (OS disks, static data)ReadWrite— only for temporary disks where data loss is acceptableNone— the safest default for data disks with unknown or mixed workloads
Forgetting lifecycle { prevent_destroy = true } on Data Disks
During Terraform refactoring — renaming a resource block, moving resources into a module — Terraform may plan to destroy and recreate a managed disk without warning. Add this block to every data disk resource that holds persistent data:
lifecycle {
  prevent_destroy = true
}
If you're renaming or moving a resource block, pair this with a moved block to preserve state without triggering a destroy/create cycle.
Troubleshooting Common Issues
Most issues fall into two categories: apply-time API errors and post-apply filesystem problems inside the VM. The three patterns below cover the most common failures.
Disk attachment fails with a "conflict" or "VM is not stopped" error
- Standard and Premium SSD disk resize operations require the VM to be deallocated first
- Ultra Disk and Premium SSD v2 support live resize with AzureRM provider v4.53.0+
- Check VM power state in the Azure Portal; deallocate before applying resize changes on standard disk types
Disk is attached but not visible or usable inside the VM
- SSH into the VM and run
lsblkto confirm the device is present at the hypervisor level - If present but unformatted, run
partedandmkfscommands manually - Check
/etc/fstabfor stale entries pointing to incorrect device paths - Use UUIDs (
blkid) rather than device names for fstab entries — device names can shift across reboots
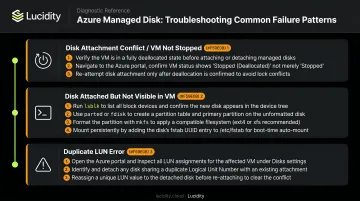
Duplicate LUN error during terraform plan or apply
- Run
az vm show -g <resource-group> -n <vm-name>and inspectstorageProfile.dataDisksto list currently attached disks and their LUN assignments - Update the Terraform configuration to use an unoccupied LUN value
- If using
for_each, verify that all LUN values in the input map are unique
Conclusion
The dependency chain for Azure VM disk provisioning in Terraform is straightforward once you understand it: NIC → VM → Disk → Attachment → Filesystem. Each step is a distinct resource, and the guest OS work (partitioning, formatting, mounting) sits outside Terraform's control entirely.
Most production failures trace back to a handful of fixable decisions:
Most production failures trace back to a handful of fixable decisions:
- Skipping
lifecycleguards on data disks - Defaulting to
ReadWritecaching on transactional workloads - Using
countfor multi-disk configurations instead offor_each
These are configuration discipline problems, not platform limitations.
The harder ongoing challenge is post-deployment. Disks that were correctly sized at launch drift over time — workloads change, capacity goes unused, and teams over-provision to hit Premium SSD performance tiers rather than right-sizing after the fact.
Lucidity's Lumen addresses this by detecting idle and over-provisioned Azure managed disks across four idle states (unattached, reserved, unmounted, zero-I/O). It surfaces tiering recommendations backed by historical IOPS and throughput data and flags disks where a move from Premium SSD to Standard SSD would cut cost without impacting performance. AutoScaler closes the loop by autonomously expanding and shrinking disks in real time, with no tickets, no downtime, and no Terraform changes required.
Frequently Asked Questions
What is the difference between the OS disk and a managed data disk in Terraform?
The OS disk is defined inline within the azurerm_linux_virtual_machine resource block and managed automatically by Azure — it doesn't require a separate resource declaration. A data disk is a standalone azurerm_managed_disk resource that must be explicitly created and attached via azurerm_virtual_machine_data_disk_attachment.
Can I resize an Azure managed disk with Terraform without downtime?
Ultra Disk and Premium SSD v2 support live online resize in AzureRM provider v4.53.0+. Standard and Premium SSD disks require the VM to be deallocated first. After any resize, extend the partition and filesystem inside the guest OS manually using growpart and resize2fs.
Which storage_account_type should I use for production workloads?
Use Premium_LRS as the default for most production VM workloads. Choose PremiumV2_LRS when you need independent IOPS and throughput tuning. Reserve UltraSSD_LRS for latency-sensitive workloads like top-tier databases. Standard_LRS belongs in backups, archives, and dev/test environments only.
How do I attach multiple managed disks to a single Azure VM in Terraform?
Define a map variable with each disk's size_gb, storage_account_type, lun, and caching values, then use for_each in both azurerm_managed_disk and azurerm_virtual_machine_data_disk_attachment. Avoid count, which causes full disk replacement whenever any entry changes position in the list.
What happens to my managed disk data if I run terraform destroy on the VM?
If the azurerm_managed_disk resource is in the same Terraform state and no prevent_destroy lifecycle rule is set, terraform destroy deletes both the VM and the disk permanently. To prevent this, add lifecycle { prevent_destroy = true } to the disk resource, or manage the disk in a separate Terraform state file.
Why is my managed disk not visible inside the VM after terraform apply?
Terraform attaches the disk at the hypervisor level but does not create a partition or filesystem. SSH into the VM, verify the device with lsblk, then run parted, mkfs, and mount commands to make the disk usable. Add the mount to /etc/fstab with the nofail option to prevent boot failures if the disk is temporarily unavailable.