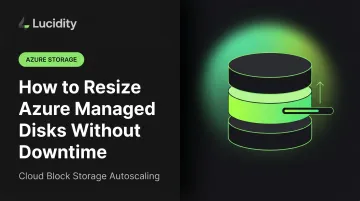
This guide covers exactly when downtime is avoidable, how to execute the resize via Portal, CLI, and PowerShell, what to do inside the OS afterward, and the limitations you need to know before touching any production disk.
Key Takeaways
- Only data disks support live resize — OS disks require VM deallocation
- Azure resize only expands; shrinking requires a manual create-copy-swap workaround
- Disks ≤ 4 TiB (Standard HDD, Standard SSD, Premium SSD) cannot cross that boundary without deallocation
- Resize always requires two steps — update the disk in Azure, then expand the volume inside the OS
- Shared disks and some classic VM SKUs are excluded from live resize entirely
What You Need Before Resizing Azure Managed Disks Without Downtime
Skipping the verification steps below is the primary reason resize operations fail or cause unplanned disruptions.
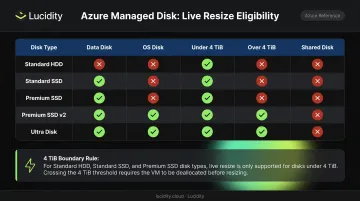
Disk Type and Size Eligibility Check
Before touching anything, confirm:
- Disk type: Standard HDD, Standard SSD, Premium SSD, Premium SSD v2, or Ultra Disk
- Disk role: Must be a data disk — not an OS disk, not a shared disk
- 4 TiB rule (Standard HDD, Standard SSD, Premium SSD only): If the disk is currently at or below 4 TiB and you're expanding beyond 4 TiB, you need VM deallocation. If it's already above 4 TiB, live resize is supported
- Premium SSD v2 and Ultra Disk: No 4 TiB restriction applies
Also confirm you're using the latest Azure CLI, Azure PowerShell module, or Azure Portal — or an ARM API version of 2021-04-01 or newer. Older tooling won't surface the live resize option.
VM SKU Compatibility Check
Not all VM SKUs support disk expansion without downtime. Classic VM sizes in particular require full deallocation. To check programmatically, use Get-AzComputeResourceSku in PowerShell to query the capabilities for your VM size in your target region, then review the capability flags returned. Look specifically for the LiveResize flag under supportedCapabilities — if it's absent or false for your VM SKU, live resize won't work.
Backup and Quota Verification
Two checks before proceeding:
- Take a snapshot — a pre-resize snapshot or Azure Backup is strongly recommended before any disk configuration change
- Check subscription quotas — verify your subscription can accommodate the new disk size; a quota limit will fail the operation mid-process, which creates its own problems
How to Resize Azure Managed Disks Without Downtime
Azure supports three methods: Portal, CLI, and PowerShell. If the disk meets eligibility criteria, there's no need to stop or deallocate the VM first.
| Method | Best For | Downtime Required? |
|---|---|---|
| Azure Portal | One-off resizes, visual confirmation | No (for eligible disks) |
| Azure CLI | Scripted workflows, automation pipelines | No (for eligible disks) |
| Azure PowerShell | Windows-centric environments, existing PS scripts | No (for eligible disks) |
Using the Azure Portal
- Navigate to the VM → Settings → Disks
- Click the target data disk under Disk name
- Go to Settings → Size + Performance
- Select the new size and click Resize
- Wait for the confirmation notification, then return to the VM's Disks settings to verify the updated size is reflected
One billing note: custom sizes below the next SKU tier are permitted, but Azure bills to the closest tier that accommodates your size. A 200 GiB Ultra Disk, for example, is billed at the 256 GiB tier rate.
For scripted or repeatable resizes — especially across multiple disks — the CLI approach is faster than navigating the portal each time.
Using Azure CLI
az disk update \
  --resource-group <resourceGroupName> \
  --name <diskName> \
  --size-gb <newSizeInGB>
If deallocation is required (OS disk or 4 TiB threshold cases), run az vm deallocate before this command and az vm start after.
If your team operates primarily in PowerShell — common in Windows-centric environments — the following achieves the same result without switching tools.
Using Azure PowerShell
$disk = Get-AzDisk -ResourceGroupName "<resourceGroupName>" -DiskName "<diskName>"
$disk.DiskSizeGB = <newSizeInGB>
Update-AzDisk -ResourceGroupName "<resourceGroupName>" -DiskName "<diskName>" -Disk $disk
Don't use Update-AzVM for managed disk resizing — Microsoft's documentation uses Update-AzDisk consistently for this workflow.
How to Expand the Volume in the OS After Resizing
This step is not optional. Resizing the disk in Azure updates the underlying storage capacity. The OS partition table and filesystem remain completely unchanged. Applications will still see the old size until you explicitly extend the volume inside the VM.
Windows: Disk Management or DiskPart
Using Disk Management:
- Connect to the VM via RDP
- Open Disk Management (or navigate via Server Manager → File and Storage Services → Volumes → Disks)
- Right-click the target data disk drive
- Select Extend Volume and follow the wizard
One constraint to know: the unallocated space must be immediately adjacent to the volume on the right side of the disk, and non-contiguous free space can't be absorbed this way.
Using DiskPart:
diskpart
list volume
select volume <n>
extend [size=<MB>]
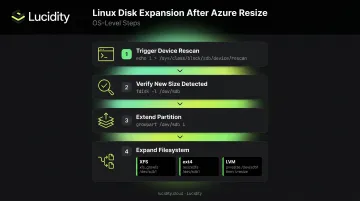
Linux: Device Rescan and Filesystem Expansion
After an online resize, Linux may not immediately detect the new disk size. Trigger a rescan first:
echo 1 | sudo tee /sys/class/block/sda/device/rescan
Replace sda with your actual device name. Verify the updated size was recognized:
sudo fdisk -l /dev/sda
From there, use the appropriate tools for your setup:
- Partition extension:
growpart /dev/sda <partition_number> - XFS filesystem:
xfs_growfs / - ext4 filesystem:
resize2fs /dev/<partition> - LVM:
pvresizefollowed bylvresize -r -L +<size>Gon the target logical volume
Per Microsoft's Linux expand-disks documentation, the OS can take up to 10 minutes to reflect the new capacity after an Azure-level resize. If the rescan doesn't show the updated size, run it again or restart the VM.
Key Limitations and Common Mistakes to Avoid
Knowing where resize operations fail — and why — keeps you from learning these lessons during a production incident.
Hard constraints you cannot work around:
- OS disks always require deallocation — the full sequence is
Stop-AzVM→ update disk size →Update-AzDisk→Start-AzVM - Standard HDD, Standard SSD, Premium SSD crossing the 4 TiB boundary require VM deallocation; Premium SSD v2 and Ultra Disk do not have this restriction
- Shared disks are categorically excluded from the "Expand without downtime" feature
- Active background disk copy operations on Premium SSD v2 and Ultra Disks will cause the resize to fail
Beyond these hard limits, two operational mistakes account for most failed or disrupted resizes:
- Skipping OS-level expansion — Azure reports success, but the new capacity stays invisible to applications until you run partition and filesystem expansion inside the VM
- Rushing into OS expansion — always confirm the updated disk size appears in the Portal or via CLI before touching the OS; proceeding too early against a still-in-progress resize will cause errors
What to Do When You Need to Shrink an Azure Managed Disk
Azure does not support direct disk shrinking. Setting a smaller size via Portal, CLI, or PowerShell is simply not possible — Microsoft explicitly documents this and notes the risk of data loss if attempted.
Manual Workaround: Create, Copy, and Swap
The only Microsoft-documented workaround:
- Create a new smaller managed disk with the desired size
- Attach and initialize the new disk inside the VM
- Copy data from the original disk using
robocopyon Windows:robocopy x:\\ y:\\ /mir /z /w:5 /r:2 /mt - Verify the transfer is complete and data is intact
- Detach and delete the original disk
This works, but it's time-consuming and carries real risk, particularly during the copy and verification steps on large disks.
Automating Right-Sizing Across Azure
At scale — dozens or hundreds of VMs — that manual burden compounds fast. Each resize requires a multi-hour copy operation, manual verification, and post-swap validation. There's no shortcut through the process.
Lucidity's AutoScaler automates disk right-sizing across Azure, AWS, and Google Cloud, expanding and shrinking disks continuously with zero downtime. Rather than reacting to storage pressure, it acts before workloads are affected, based on how each volume actually behaves. Results from enterprise customers include:
- Iron Mountain eliminated hundreds of hours of manual provisioning work
- Dometic reduced cloud storage spend by 52%
For teams running storage at scale, that's the difference between a repeatable, hands-off process and a permanent operational drain.
Frequently Asked Questions
Does resizing an Azure managed disk delete data?
No — resizing a managed disk does not modify or delete stored data. That said, taking a snapshot before any disk configuration change is strongly recommended, especially before the OS-level expansion step.
Can you shrink an Azure managed disk?
Native disk shrinking is not supported by Azure. The only documented workaround is creating a new smaller disk, copying data manually using robocopy (Windows) or equivalent, and deleting the original disk.
Which disk types support resizing without downtime?
Standard HDD, Standard SSD, Premium SSD (subject to the 4 TiB threshold rule), Premium SSD v2, and Ultra Disk all support live resize for data disks. Shared disks and OS disks are excluded.
How long does an Azure managed disk resize take?
The Azure-level operation typically completes in a few seconds to a few minutes. The OS can take up to 10 minutes to reflect the new size. On Linux, a manual rescan may be needed, and this timing applies across all disk types.
Do I need to restart the VM after resizing a managed disk?
For eligible data disks, no restart is required after the Azure-level resize. If deallocation was required (OS disk or 4 TiB crossing cases), the VM must be restarted. Regardless, the OS volume still needs to be manually expanded. That expansion step does not require a reboot.