Introduction
Most Azure storage waste doesn't come from running expensive VMs — it comes from disks. Managed disks attached to VMs (or no longer attached to anything) quietly accumulate charges whether they're storing active data or sitting completely idle.
This guide focuses specifically on Azure managed disk right-sizing: aligning Premium SSD, Standard SSD, Standard HDD, and Ultra Disk configurations to what your workloads actually need. This is distinct from VM right-sizing — you can have a perfectly sized VM attached to a wildly over-provisioned disk.
The cost problem is real. According to Harness's 2025 FinOps in Focus report, 21% of enterprise cloud infrastructure spend — roughly $44.5B in 2025 — is wasted on underutilized resources. Disks are a significant piece of that.
Lucidity's analysis of 600+ enterprise assessments covering over 100 petabytes of storage data found that average enterprise disk utilization sits at just 30% — meaning 70% of provisioned capacity goes unused. That gap is where the money leaks.
What follows is a practical breakdown of how to find over-provisioned disks, understand how Azure billing works against you, execute right-sizing without service disruption, and set up a process to keep waste from drifting back.
Key Takeaways
- Azure disk right-sizing means matching disk type, size, and IOPS/throughput tier to actual workload consumption
- Over-provisioned and unattached disks are persistent cost leaks that native tools only partially surface
- Azure Advisor flags some issues, but misses IOPS/throughput tier waste and three of the four idle disk categories
- A five-step audit process across Cost Management, Advisor, Azure Monitor metrics, orphaned snapshots, and prioritization identifies the full savings opportunity
- Automation platforms like Lucidity make right-sizing continuous rather than a manual quarterly scramble
What Is Azure Disk Right-Sizing and Why Does It Matter
Azure disk right-sizing means aligning each managed disk's SKU, provisioned size, and performance settings to actual workload consumption. That means billing for what you use, not what you might someday need.
Two Dimensions of Over-Provisioning
Most organizations over-provision in two distinct ways:
- Capacity over-provisioning — allocating 1 TB when only 200 GB is consumed, because Azure bills per provisioned GiB regardless of how much you use
- Tier over-provisioning — paying for Premium SSD when Standard SSD performance is sufficient, because someone selected it at provisioning time and nobody revisited it
Both translate directly to wasted spend every hour the disk exists.
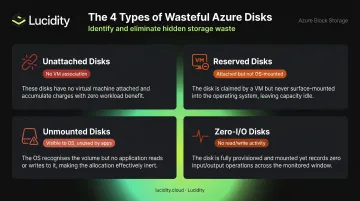
Four Categories of Wasteful Disks
Not all idle disks look the same. In practice, wasteful disks fall into four distinct categories:
- Unattached disks — no VM association at all; the most visible form of waste
- Reserved disks — attached to a VM but not mounted inside the OS
- Unmounted disks — visible to the OS but not in active use by any application
- Zero-I/O disks — attached, mounted, and accessible, but recording no read/write activity
Azure Advisor surfaces unattached disks and some underutilized signals. The other three categories — reserved, unmounted, and zero-I/O — largely go undetected by native tools, which means they keep accumulating cost silently. That detection gap is where significant spend hides. Lucidity's Lumen product is built specifically to close it, surfacing all four disk types including those that never appear in standard cloud console views.
The Performance Risk of Under-Sizing
Right-sizing isn't purely a cost exercise. Under-provisioned disks hit IOPS and throughput ceilings before workload demand does, and the symptoms surface as application problems rather than infrastructure alerts. Watch for these signals:
- Sustained latency spikes during normal (not peak) load
- Throttling events visible in Azure Monitor disk metrics
- Application timeouts that correlate with disk I/O rather than CPU or memory
The goal is a disk sized to actual consumption — with enough headroom for realistic growth, not worst-case buffers.
Understanding Azure Disk Types and Their Cost Implications
Disk Type Comparison
| Disk Type | Primary Use Case | Max IOPS | Max Throughput | Billing Model |
|---|---|---|---|---|
| Ultra Disk | SAP HANA, top-tier databases | 400,000 | 10,000 MB/s | Provisioned size + IOPS + throughput |
| Premium SSD v2 | SQL Server, Oracle, Cassandra, MongoDB | 80,000 | 1,200 MB/s | Provisioned size + IOPS above baseline + throughput above baseline |
| Premium SSD v1 | Production, low-latency workloads | 20,000 | 900 MB/s | Fixed P-tier with optional performance tier uplift |
| Standard SSD | Web servers, dev/test, lower-IOPS apps | 6,000 | 750 MB/s | Fixed E-tier; transaction costs apply |
| Standard HDD | Archival, infrequent access, dev/test | 2,000 | 500 MB/s | Fixed S-tier; transaction costs apply |
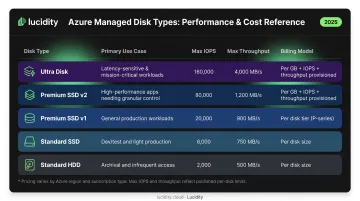
For current pricing by region, refer to the Azure Managed Disks pricing page — rates change and vary by agreement.
How Azure Disk Billing Creates Waste
Azure bills for provisioned capacity, not consumed capacity. A 200 GiB Standard SSD is billed as an E15 256 GiB disk — the nearest tier up. Every GiB you provision beyond what you actually use is pure cost with no workload benefit.
Premium SSD v1 uses fixed P-tier sizes, but its performance tier can be raised independently of disk size — and while elevated, you're billed at the higher tier's rate. Downgrading that performance tier is limited to once every 12 hours.
Premium SSD v2 and Ultra Disk take this further: IOPS and throughput are provisioned and billed independently of capacity. This creates a right-sizing problem native tools often miss — you might have the right disk size but be paying for 40,000 IOPS when your workload peaks at 8,000.
When a Tier Downgrade Makes Sense
Some workloads are running on Premium SSD when Standard SSD is entirely sufficient:
- Dev/test environments with no latency SLA
- Infrequently accessed data or archival workloads
- Applications that were migrated "lift and shift" and never re-evaluated
- Disks sized for peak loads that have since dropped
The key question is whether actual IOPS and throughput consumption requires Premium SSD's performance ceiling, or whether Standard SSD's 6,000 IOPS and 750 MB/s is more than adequate.
How to Identify Azure Disks That Need Right-Sizing
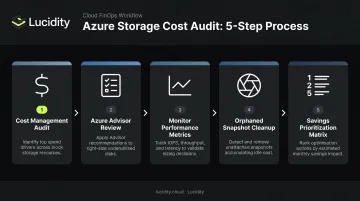
A complete disk audit requires five sequential steps. Skipping to step two without completing step one leaves the largest cost contributors invisible.
Step 1 — Audit Disk Spend in Azure Cost Management
Start in Azure Cost Management + Billing. Filter by resource type (managed disks), group by resource group and subscription, and sort by cost. This reveals your largest disk cost contributors and surfaces any disk resources without an associated VM resource ID — a reliable proxy for unattached status.
For programmatic identification, a disk's ManagedBy property returns null when unattached. Run az disk list --query '[?managedBy==null].[id]' -o tsv in Azure CLI to return all unattached disk IDs.
Step 2 — Review Azure Advisor Cost Recommendations
Azure Advisor's Cost pillar surfaces unattached disk recommendations and some high-level underutilization signals. Navigate to Advisor → Cost and filter for disk-related recommendations. Export the full list for prioritization rather than acting on individual items one at a time.
Advisor also covers recommendations for storing managed disk snapshots in Standard Storage and for Azure Managed Disk reservations — both worth reviewing alongside unattached disk findings.
Step 3 — Analyze Performance Metrics in Azure Monitor
Most teams skip this step — which is why underutilized active disks keep slipping through. Azure Monitor tracks four key metrics for microsoft.compute/disks:
- Disk Read Ops/sec and Disk Write Ops/sec — compare against provisioned IOPS ceiling
- Disk Read Bytes/sec and Disk Write Bytes/sec — compare against provisioned throughput ceiling
Use a 30–90 day lookback window to capture workload seasonality. Azure Monitor retains platform metrics for 93 days, so the full window is available. A disk consuming 15% of its provisioned IOPS ceiling consistently over 60 days is a strong right-sizing candidate.
Step 4 — Identify Orphaned Snapshots and Images
Right-sizing scope extends beyond active disks. Snapshots and custom images from decommissioned VMs continue accruing charges indefinitely. Incremental snapshots are billed based on used size; instant access snapshots for Ultra Disk and Premium SSD v2 carry additional restore fees.
Azure Disk Storage reservations apply to managed disks only — not snapshots — so snapshot cleanup is a straightforward deletion exercise with no reservation trade-off involved.
Step 5 — Prioritize with a Savings-Potential Matrix
Rank candidates by combining three factors:
- Gap between provisioned and consumed capacity — larger gap = higher savings potential
- Current disk SKU cost — Premium SSD waste is worth more to address than Standard HDD waste
- Disk status — unattached disks are zero-risk deletions; active production disks require more care
Start with unattached disks — they're zero-risk and deliver immediate savings. From there, work through tier downgrade candidates for active workloads, using the 30–90 day performance data from Step 3 to validate each change before making it.
Step-by-Step Process to Right-Size Azure Disks
Resizing an Existing Disk
In the Azure portal, navigate to the disk resource → Size + performance under Settings. You can change disk size or SKU from this view.
Key technical constraints to know:
- Online capacity expansion for data disks is supported without deallocating the VM — but not for shared disks
- Standard HDD, Standard SSD, and Premium SSD disks at or below 4 TiB must be deallocated and detached before expanding beyond 4 TiB
- SKU conversion (for example, Premium SSD to Standard SSD) requires a VM restart
- Migrating to Premium SSD v2 or Ultra Disk requires detaching Standard HDD or Standard SSD disks from their VMs; incremental snapshots are the documented migration method
Deleting Unattached and Idle Disks
Before deleting any disk:
- Confirm the
ManagedByproperty is null or the portal shows "Unattached" disk state - Verify with the resource owner that the data is no longer needed or has been backed up
- Delete via the portal for individual disks, or use Azure CLI (
az disk delete --ids <id> --yes) or PowerShell (Remove-AzDisk) for bulk operations
Do not delete without owner confirmation. An unattached disk is not automatically worthless — it may contain data from a recently decommissioned VM that someone still needs.
Coordinating the Change
Right-sizing requires coordination across three functions:
- FinOps identifies and prioritizes candidates
- Application/workload owners validate that the resize won't violate SLAs or vendor support requirements
- Engineers execute within a scheduled change window, with a tested rollback plan ready
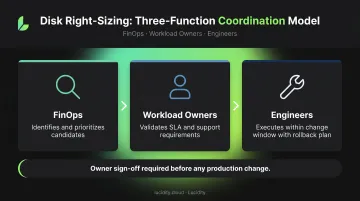
Owner sign-off before any production disk change is non-negotiable. Without it, cost savings can quickly become outage tickets.
Limitations of Native Azure Tools for Disk Right-Sizing
Azure Advisor covers the basics: unattached disks, snapshot storage optimization, and managed disk reservation recommendations. That's a useful starting point, but it leaves substantial savings on the table.
What Advisor doesn't cover:
- IOPS and throughput tier right-sizing for Premium SSD v2 and Ultra Disk independent provisioning
- Performance tier downgrade recommendations for Premium SSD v1
- Reserved, unmounted, and zero-I/O disk categories (only unattached disks are surfaced)
- Snapshot cleanup recommendations beyond the "store in Standard Storage" suggestion
The coverage gaps compound a separate issue: scale. Each Advisor recommendation requires individual review, owner validation, and manual execution. Across hundreds or thousands of disks in a large Azure environment, this creates an operational burden that most FinOps and engineering teams can't absorb on top of their existing work.
Lucidity's Lumen fills this gap. Lumen delivers real-time visibility into every disk, uniquely identifies all four idle disk categories, and continuously scores each disk's tier against actual IOPS, throughput, latency, and cost patterns.
Tier changes — for example, Azure Premium SSD to Standard SSD — can be scheduled, executed, or rolled back directly from the dashboard without scripting or maintenance windows. For teams managing hundreds or thousands of disks, that turns right-sizing from a quarterly scramble into a continuous, low-effort practice.
Best Practices for Continuous Azure Disk Optimization
Right-sizing done once is already out of date six months later. Workloads change, teams provision new disks, and over-provisioning accumulates quietly between reviews.
Build a Recurring Review Cadence
- Run monthly or quarterly reviews in Azure Cost Management with resource tagging so new disks get flagged before waste compounds
- Tag disks at provisioning time with workload owner, environment (prod/dev/test), and review date to make audits faster
Pair Right-Sizing with Complementary Cost Levers
- Azure Disk Reservations cover Premium SSD P30–P80 SKUs on a one-year term — once you've landed on the correct tier, reservations lock in savings on predictable baseline usage
- Delete-on-VM-termination settings prevent the next wave of unattached disks; Microsoft documents the
deleteOptionproperty asDeleteto enable this behavior - Snapshot hygiene: incremental snapshots from decommissioned VMs don't clean themselves up, so include them in every review cycle
For teams that need continuous enforcement rather than periodic reviews, Lucidity monitors every disk in real time and flags optimization opportunities as they appear. The free Lucidity Assessment gives you an immediate baseline across your Azure managed disk environment — showing current spend, potential savings, and downtime risk in about five minutes, with no agents and no infrastructure changes required.
Frequently Asked Questions
What is rightsizing in Azure?
Rightsizing in Azure means matching disk resources to actual workload requirements — eliminating over-provisioned capacity and unnecessary performance tiers to cut cost without affecting application performance.
What types of Azure disks can be right-sized?
All four managed disk types — Ultra Disk, Premium SSD v1/v2, Standard SSD, and Standard HDD — can be right-sized. Options include reducing provisioned capacity, downgrading to a lower-cost tier, adjusting independently provisioned IOPS/throughput (for v2 and Ultra), or deleting unattached and idle disks entirely.
Can Azure disks be resized without downtime?
Azure supports online capacity expansion for data disks without deallocating the VM, but SKU conversions (such as Premium SSD to Standard SSD) require a VM restart. Lucidity handles tier changes without maintenance windows by automating the conversion process.
How do I find unattached disks in Azure?
Check the disk's state in the Azure portal for "Unattached," or use Azure CLI to query managedBy == null. Azure Advisor's Cost tab also surfaces disks with no recent activity, though it misses some idle disk categories — unmounted and zero-I/O disks, for instance.
What metrics should I monitor for Azure disk right-sizing?
The four key Azure Monitor metrics are: Disk Read Ops/sec, Disk Write Ops/sec, Disk Read Bytes/sec, and Disk Write Bytes/sec. Compare peak and average values against the disk's provisioned IOPS and throughput ceiling over a 30–90 day window to identify the right-sizing gap.
How often should Azure disk right-sizing be performed?
A monthly or quarterly cadence works for most organizations. Environments with rapid team growth or dynamic workloads benefit from more frequent reviews. Automated platforms like Lucidity make right-sizing continuous — monitoring disks and acting on recommendations without manual review.