Introduction
Azure Ultra Disks sit at the top of the managed disk performance hierarchy — and that comes with real operational weight. Getting them wrong isn't just a configuration headache; it generates unnecessary costs the moment you enable compatibility on a VM, even before attaching a single disk.
The practical friction is substantial. Ultra Disks require specific VM families, availability zone deployment, separate IOPS and throughput provisioning, and a deliberate attachment sequence. Miss any of these, and you'll either hit a deployment error or quietly burn through your reservation budget.
This guide covers each of those friction points in sequence: verifying prerequisites, enabling compatibility, attaching and formatting the disk, tuning performance at runtime, and avoiding the cost traps that catch teams managing high-performance storage at scale — using both Azure Portal and CLI/PowerShell.
Key Takeaways
- Ultra Disks deliver up to 400,000 IOPS and 10,000 MB/s throughput and attach only as data disks, not OS disks
- Enabling Ultra Disk support requires an explicit VM setting; existing VMs must be stopped (deallocated) before you can turn it on
- Performance (IOPS, throughput, capacity) can be adjusted up to 4 times per 24-hour window without detaching the disk
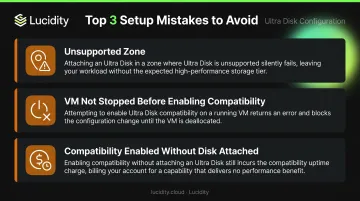
- Verify VM size, region, and availability zone before deployment — Ultra Disk support varies by zone even within supported regions
- Enabling Ultra Disk compatibility without attaching a disk incurs a per-vCPU reservation fee, so disable it when unused
When Should You Use Azure Ultra Disks?
Ultra Disks are not a general-purpose upgrade. Use them only when sub-millisecond latency is a hard requirement and you can demonstrate that Premium SSD is the actual bottleneck.
According to Microsoft, Ultra Disks are positioned for SAP HANA, top-tier OLTP databases, NoSQL, and transaction-heavy workloads where latency directly impacts throughput. Microsoft's SQL Server on Azure VM storage guidance recommends Ultra Disks specifically when a VM doesn't support Write Accelerator and requires sub-millisecond storage latency for transaction logs.
Workloads That Actually Warrant Ultra Disks
- SAP HANA — in-memory data persistence with strict latency SLAs
- SQL Server transaction logs — write-ahead log latency caps transaction throughput
- Oracle databases — high IOPS on dedicated data disks
- Real-time financial trading platforms — consistent sub-millisecond response required
Where Ultra Disks Are Commonly Misused
Teams frequently provision Ultra Disks for workloads that don't need them:
- Web servers and application tiers
- Dev/test environments
- Backup and archival storage
- General-purpose VMs with moderate IO
For most production workloads, Premium SSD v2 is the better call. It's designed for IO-intensive enterprise workloads needing sub-millisecond latency at significantly lower cost, and it doesn't carry Ultra Disk's zonal and VM-size restrictions.
Beyond cost, three hard platform limits disqualify Ultra Disks for certain architectures entirely:
- Cannot be used as OS disks
- Do not support disk caching
- Incompatible with availability sets
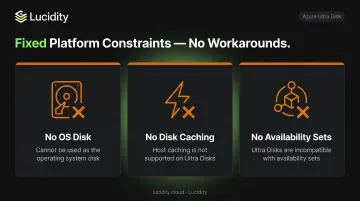
None of these are configurable workarounds — they're fixed platform constraints.
What You Need Before Using Azure Ultra Disks with a VM
Skipping this section is the most common cause of failed deployments. Verify all three prerequisites before writing a single CLI command.
VM Size and Region Compatibility
Ultra Disk support is zone-specific, not just region-specific. Supported VM families include:
- General purpose / memory optimized: DSv3, Esv3/4/5
- Memory optimized: M-series
- Compute optimized: FSv2
- Storage optimized: LSv2, Lsv3
- GPU: NCv3, NCasT4_v3, NVv3, NVv4
Always validate before deploying. Run these commands first:
# Check zone-level Ultra Disk support for a specific VM size
az vm list-skus --resource-type virtualMachines --location $region \
  --query "[?name=='$vmSize'].locationInfo[0].zoneDetails[0].Name" \
  --subscription $subscriptionId

# Check full capability set
az vm list-skus --resource-type virtualMachines --location $region \
  --query "[?name=='$vmSize'].capabilities" \
  --subscription $subscriptionId
For PowerShell, use Get-AzComputeResourceSku filtered by location, VM size, and zone details. No output means that VM size doesn't support Ultra Disk; select a different SKU and re-run.
Availability Zone Deployment
Once you've confirmed which zone supports your target VM size, that zone locks your entire deployment. Ultra Disks are LRS-only and require zonal VM placement — availability sets are incompatible. The zone choice is permanent and cannot be changed after deployment.
Additional Requirements
- OS disk: must use a separate disk type (Premium SSD recommended) — Ultra Disk cannot serve as an OS disk
- Subscription quota: default is 100 TiB of Ultra Disk capacity per region per subscription — verify this hasn't been consumed before deployment
How to Use Azure Ultra Disks with Virtual Machines (Step-by-Step)
Attaching an Ultra Disk follows a strict sequence. Skipping or reordering steps — especially enabling VM compatibility before attachment — is the primary source of failed deployments and unexpected reservation charges.
Setup and Preparation
Run the validation commands above before touching the VM. If the output confirms Ultra Disk support for your VM size and zone, proceed. If not, stop and select a supported SKU before continuing.
Most common setup errors:
- Enabling compatibility on a VM not deployed in a supported zone
- Forgetting to stop an existing VM before enabling compatibility
- Enabling compatibility without immediately attaching a disk (triggers reservation fee)
Enabling Ultra Disk Compatibility and Attaching the Disk
New VM (Portal):
- During VM creation, select your Availability Zone
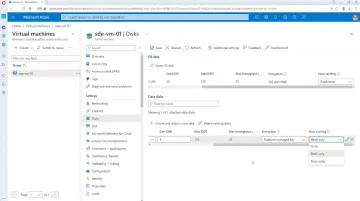
- Go to Disks tab → Enable Ultra Disk compatibility → Yes
- Proceed with disk attachment during creation
Existing VM (Portal):
- Stop (deallocate) the VM — this is mandatory
- Navigate to Disks → Additional Settings
- Enable Ultra Disk compatibility → Save
- Restart the VM before attaching
Creating and attaching via CLI:
# Create the disk
az disk create \
  --resource-group myRG \
  --name myUltraDisk \
  --size-gb 1024 \
  --sku UltraSSD_LRS \
  --disk-iops-read-write 20000 \
  --disk-mbps-read-write 1000 \
  --zone 1 \
  --location eastus

# Attach to VM
az vm disk attach --resource-group myRG --vm-name myVM --name myUltraDisk
For 512E sector size (required for Oracle Database prior to release 12.2): add --logical-sector-size 512 to the az disk create command. Ultra Disks default to 4K physical sector size. This setting is permanent — it cannot be changed after disk creation.
PowerShell:
$diskConfig = New-AzDiskConfig -AccountType UltraSSD_LRS -Location eastus `
  -Zone 1 -DiskSizeGB 1024 -DiskIOPSReadWrite 20000 -DiskMBpsReadWrite 1000 `
  -CreateOption Empty

$disk = New-AzDisk -ResourceGroupName myRG -DiskName myUltraDisk -Disk $diskConfig
Add-AzVMDataDisk -VM $vm -Name myUltraDisk -CreateOption Attach -ManagedDiskId $disk.Id -Lun 1
Once the disk is attached and the VM is running, proceed to initialize and format the volume.
Formatting and Configuring the Disk for Use
After attachment, the disk won't appear as a usable volume until you initialize and format it.
Windows: Open Disk Management → initialize the new disk → create a partition → format as NTFS
Linux:
sudo fdisk /dev/sdc      # or parted for GPT
sudo mkfs.ext4 /dev/sdc1
sudo mount /dev/sdc1 /mnt/ultradisk
For SQL Server: Before moving any data, configure folder permissions so the SQL Server service account has full control over the new disk's directory (folder Properties → Security tab). The standard migration pattern: detach the database, move the log file to the new Ultra Disk volume, then reattach.
Adjusting Ultra Disk Performance at Runtime
Unlike Premium SSD, Ultra Disk allows you to modify IOPS, throughput, and capacity live — without detaching the disk or restarting the VM.
Portal: VM → Disks → select Ultra Disk → Size + Performance → modify values → Save
CLI:
az disk update \
  --resource-group myRG \
  --name myUltraDisk \
  --disk-iops-read-write 40000 \
  --disk-mbps-read-write 2000
PowerShell:
$diskUpdate = New-AzDiskUpdateConfig -DiskIOPSReadWrite 40000 -DiskMBpsReadWrite 2000
Update-AzDisk -ResourceGroupName myRG -DiskName myUltraDisk -DiskUpdate $diskUpdate
Critical constraint: Performance changes are limited to 4 per 24-hour window, and each change can take up to one hour to propagate. Plan adjustment windows during low-traffic periods — not mid-incident.
Monitoring During Active Use
Monitor both disk-level and VM-level metrics. A disk provisioned for 400,000 IOPS cannot overcome a lower VM uncached IO ceiling.
| Azure Monitor Metric | What It Tells You |
|---|---|
Data Disk IOPS Consumed Percentage |
% of provisioned disk IOPS in use |
Data Disk Bandwidth Consumed Percentage |
% of provisioned throughput in use |
Data Disk Latency |
Average IO completion time |
VM Uncached IOPS Consumed Percentage |
If at 100%, VM is the ceiling, not the disk |
VM Uncached Bandwidth Consumed Percentage |
VM-level throughput cap indicator |

Two patterns in particular warrant immediate attention:
Watch for these signals:
- Actual IOPS consistently approaching provisioned limits → disk or VM ceiling is being hit
- Performance change operations failing → insufficient platform bandwidth capacity; retry during off-peak hours
Where Azure Ultra Disks Are Commonly Used
Ultra Disk deployments concentrate in workloads where storage latency is on the critical path of business operations.
BlackRock's Aladdin platform is one of the most cited examples. Microsoft's customer story describes the investment technology platform moving production in and out of Azure more than 10 times over one year using Ultra Disk Storage — including processing its highest trading volume day on record.
The primary workload categories:
- SAP HANA: Listed in Microsoft's Ultra Disk documentation and Azure SAP storage planning guidance as a primary fit
- SQL Server transaction logs: Write latency on the log disk directly sets the ceiling for transactions per second
- Oracle high-IOPS configurations: Pre-12.2 releases require 512E sector size support on dedicated data disks
- Financial trading platforms: Single-digit millisecond response times are often contractual, not aspirational
These use cases also push the upper bounds of what Azure storage can deliver. Azure Boost-enabled Mbv3 VMs such as the Standard_M416bs_v3 now reach 550,000 IOPS and 10 GB/s with Ultra Disk. That exceeds the 400,000 IOPS per-disk limit, meaning the right VM family can push performance beyond what the disk spec alone suggests.
Best Practices for Getting the Most Out of Azure Ultra Disks
Avoid Over-Provisioning IOPS and Throughput
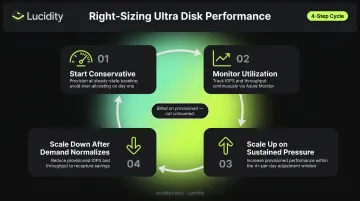
Unlike Premium SSD, Azure pricing bills Ultra Disk on provisioned size, IOPS, and throughput — not what you actually consume. Every unit you over-provision costs money whether the workload uses it or not.
Provisioning 50,000 IOPS when a workload peaks at 12,000 wastes money continuously. Start conservative and adjust from there:
- Start conservative — provision at expected steady-state, not peak
- Monitor actual utilization via Azure Monitor
- Use the 4x/day adjustment window to scale up when metrics show sustained pressure
- Scale back down after demand normalizes
For teams managing Ultra Disks across multiple VMs, Lucidity's Lumen surfaces real-time visibility into actual vs. provisioned utilization. It tracks IOPS, throughput, latency, and cost trends against provisioned tiers — flagging volumes that are chronically over-provisioned before they become a budget problem.
Follow Zonal and Redundancy Discipline from the Start
Ultra Disks are LRS-only, and the availability zone assignment is permanent. There's no migration path between zones post-deployment.
- Document zone assignments at deployment time
- Confirm VM and disk are always in the same zone
- Configure Azure Site Recovery for cross-region DR proactively — ASR supports VMs with Ultra Disks, though Zonal Disaster Recovery is not supported for this disk type
Manage the VM Reservation Fee Deliberately
Enabling Ultra Disk compatibility on a VM without attaching a disk generates a per-vCPU hourly reservation charge. On larger VM sizes, this adds up fast.
- Disable Ultra Disk capability on any VM where it's no longer needed
- Audit the subscription regularly for VMs with compatibility enabled but no Ultra Disk attached
- Treat the reservation fee as a forcing function: enable compatibility only when you're ready to attach
Frequently Asked Questions
What is an Azure Ultra Disk?
Azure Ultra Disk is the highest-performance managed disk tier in Azure, designed for data-intensive, latency-sensitive workloads. IOPS (up to 400,000), throughput (up to 10,000 MB/s), and capacity (up to 64 TiB) are independently configurable. It can only be used as a data disk — not an OS disk.
Which is better: Azure Ultra Disk or Premium SSD?
It depends on the workload. Ultra Disk is the right choice when sub-millisecond latency and very high IOPS are non-negotiable: SAP HANA, financial trading, SQL transaction logs. Premium SSD v2 covers most production workloads at lower cost, without Ultra Disk's zonal restrictions or VM-size constraints.
How does Ultra Disk compare to other Azure managed disk tiers?
Azure managed disks come in five tiers by performance: Ultra Disk, Premium SSD v2, Premium SSD, Standard SSD, and Standard HDD. Ultra Disk sits at the top — reserved for workloads where cost is secondary to latency and throughput.
Can Azure Ultra Disks be used as OS disks?
No. Ultra Disks are supported only as data disks. The OS disk must use a different type — Premium SSD is recommended. This is a hard platform constraint with no workaround.
How many times can you adjust Ultra Disk performance in a day?
Up to four times within any 24-hour window. Each change can take up to an hour to take effect. Adjustments can be made without detaching the disk or restarting the VM.
What VM sizes are compatible with Azure Ultra Disks?
Supported families include DSv3, Esv3/4/5, M-series, FSv2, LSv2/3, NCv3, and others. Compatibility is zone-specific — not every supported size is available in every supported region. Always validate using az vm list-skus or Get-AzComputeResourceSku before deployment.