The frustrating part? Azure provides no native way to shrink a disk. You can only expand.
This guide covers why that limitation exists, the two supported workaround methods (one for data disks, one for OS disks), the prerequisites you need to have in place, and the mistakes that cause data loss when teams attempt this without proper preparation.
Key Takeaways
- Azure natively supports disk expansion only — shrinking requires manual workarounds
- Data disks: Create a smaller disk, copy data with robocopy or rsync, then detach and delete the original
- OS disks: Shrink the in-guest partition, export the disk, resize the VHD footer via PowerShell, then swap the managed disk
- Always shrink the filesystem partition before any Azure-level operation — skipping this risks data corruption or an unbootable VM
- Verify data integrity completely before deleting the original disk
Why Azure Doesn't Natively Support Disk Shrinking
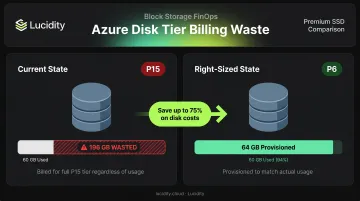
Azure managed disks are billed in fixed SKU tiers regardless of how much data actually sits on them. Per Microsoft's managed disk pricing, the disk is billed at whichever tier accommodates the provisioned size, rounded up.
Here's what that looks like in practice:
| Disk Family | Common Size Tiers |
|---|---|
| Premium SSD v1 | P4 (32 GB), P6 (64 GB), P10 (128 GB), P15 (256 GB), P20 (512 GB) |
| Standard SSD | E4 (32 GB), E6 (64 GB), E10 (128 GB), E15 (256 GB), E20 (512 GB) |
| Standard HDD | S4 (32 GB), S6 (64 GB), S10 (128 GB), S15 (256 GB), S20 (512 GB) |
A team that provisions a 256 GB Premium SSD but only uses 60 GB pays at the P15 rate indefinitely. Moving to P6 (64 GB) would cut that disk's cost roughly in half — but there's no button in the portal to make that happen.
Microsoft's official position is straightforward: direct disk size reduction is unsupported due to data loss risk. Expanding a disk is safe because no existing data boundary is disturbed. Shrinking carries the opposite risk — if the logical partition exceeds the new physical boundary, the filesystem can be corrupted.
Teams that over-provision at VM creation time have no native reclaim mechanism in Azure. That means the only way to recover that spend is through a manual workaround — which is exactly what the next section covers.
Before You Begin: Key Prerequisites
Skipping these steps is the fastest way to corrupt data or brick a VM. Both methods share the same prerequisites — verify each one before proceeding.
Permissions Required
| Role | What It Covers |
|---|---|
| Virtual Machine Contributor | Create/manage VMs, read/write/delete disks (Microsoft.Compute/disks/*) |
| Storage Account Contributor | Manage storage accounts (needed for VHD export workflows) |
| Data Operator for Managed Disks | Upload/download/export disk data via SAS URI |
Critical Pre-Flight Checks
- Shrink the in-guest partition before any Azure-level resize — the OS volume must already be smaller than your target size. This is the most common cause of boot failures and data corruption.
- Take a snapshot of the original disk before starting. Both methods involve destructive operations, and a snapshot gives you a recovery path if the resize fails.
- Confirm your target size crosses a tier boundary. A 65 GB disk still bills at the 128 GB tier (E10/P10) — drop to 64 GB to hit the E6/P6 tier and actually save money.
How to Shrink an Azure VM OS Disk Without Data Loss
This method applies when the disk you need to shrink is the boot disk. It's more complex than the data disk method and involves temporarily replacing the disk attached to the VM. It works for both Windows and Linux.
Step 1: Shrink the OS Partition Inside the Guest OS
Do this before deallocating the VM.
On Windows:
- Connect via RDP and open PowerShell as Administrator
- Run
Get-Partitionto identify the OS partition number - Run
Resize-Partition -DriveLetter C -Size <target size in bytes>to shrink it below the intended new disk size - Account for the System Reserved partition (~500 MB) in your size calculation
On Linux:
- Use
resize2fsto shrink the filesystem first - Use
fdiskorpartedto shrink the partition to match - Leave adequate headroom below your target disk size
Step 2: Deallocate the VM and Note the Disk Resource ID
Shut down the VM from within the OS first, then deallocate it from the Azure Portal. The status must show Stopped (deallocated) — not just Stopped. From the disk's Properties blade, copy the full Resource ID. You'll need this in the next step.
Step 3: Resize the Managed Disk Using PowerShell
This step uses the community Shrink-AzDisk PowerShell script. Note that this is a community-maintained script (last updated July 2023), not an officially supported Microsoft tool.
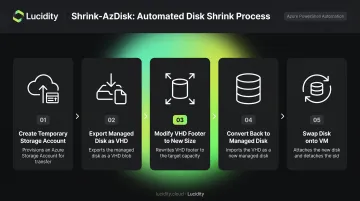
The script automates the disk conversion process end-to-end:
- Creates a temporary Storage Account
- Exports the managed disk as a VHD
- Modifies the VHD footer to reflect the new size
- Converts it back to a managed disk
- Swaps it onto the VM
Set these variables before running:
$DiskID = "<Resource ID from Step 2>"
$VMName = "<your VM name>"
$DiskSizeGB = <target size — must match a valid SKU tier>
$AzSubscription = "<your subscription ID>"
Step 4: Validate Before Removing Anything
Once the VM restarts with the new disk, extend the OS volume to fill remaining unallocated space — use Disk Management on Windows or growpart/resize2fs on Linux. Before deleting any export artifacts or snapshots, verify:
- VM boots successfully and reaches the login prompt
- Applications behave normally under a brief smoke test
- New disk size reflects correctly in the Azure Portal
How to Shrink an Azure VM Data Disk Without Data Loss
This method follows Microsoft's documented guidance for reducing data disk size and works for both Windows and Linux. Before starting, confirm the disk is a data disk (not the OS disk), that you have access to the Azure Portal, and that you know your target disk size. Plan for a brief service interruption during the data copy step.
Step 1: Shrink the Volume Inside the Guest OS
Shrink the volume inside the VM before touching anything in Azure:
- Windows: Open Disk Management (
diskmgmt.msc) or use PowerShell to shrink the volume. Confirm used space fits within your target size — ideally with at least 20% headroom. - Linux: Use
resize2fsto shrink the filesystem, thenfdiskorpartedto reduce the partition size.
Step 2: Create a New Smaller Disk and Attach It
In the Azure Portal:
- Go to the VM's Disks blade
- Select Create and attach a new disk
- Set the size to your target (smaller) value
- Match the storage type and encryption settings of the original disk
Once attached, prepare the new disk inside the guest OS:
- Windows: Initialize the disk in Disk Management and assign a drive letter.
- Linux: Use
fdiskandmkfsto format and mount it.
Step 3: Copy Data to the New Disk
Before copying, stop all services that access the source disk. Skipping this risks copying files mid-write, which can cause corruption or incomplete transfers.
Windows (robocopy):
robocopy D:\\ E:\\ /mir /z /sec
/mirmirrors the full directory tree/zenables restartable mode for interrupted transfers/secpreserves security permissions and timestamps
Linux (rsync):
rsync -avz /mnt/olddisk/ /mnt/newdisk/
After copying, verify file counts, directory structure, and total data size on the destination match the source before proceeding.
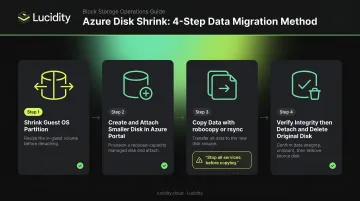
Step 4: Detach and Delete the Old Disk
- In the VM's Disks blade, click the detach icon next to the old data disk and save
- Restart dependent services and run application tests
- Confirm all data is intact and accessible
- Only after full validation, navigate to the disk resource and delete it to stop billing
Detaching a disk does not delete it. Charges continue until the disk resource is explicitly deleted.
Common Mistakes to Avoid
Skipping the in-guest partition shrink. If the logical partition occupies more space than the new disk size, the VM will fail to boot (OS disk) or the volume will be corrupted (data disk). This step is non-negotiable.
Deleting the source disk before the copy is confirmed. Verify file counts, application functionality, and database consistency before issuing the delete command. Losing data here is permanent — there's no recovery path once the source disk is gone.
Missing the tier boundary on your target size. Azure rounds up to the nearest offered disk size, so precision matters. A 65 GB disk bills at the 128 GB tier (P10/E10), while a 64 GB disk bills at the 64 GB tier (P6/E6). Check the Azure Managed Disks pricing page to confirm tier boundaries before setting your target size.
Preventing Azure Disk Over-Provisioning Going Forward
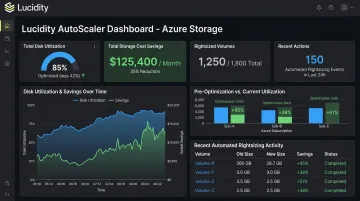
Manual disk shrinking is a symptom of a larger pattern. Teams over-provision storage at VM creation to accommodate anticipated growth — but that growth often doesn't materialize on schedule, and the cost accumulates quietly. The average enterprise disk utilization sits around 30% — Lucidity's analysis across 600+ storage assessments covering 100+ petabytes consistently surfaces this benchmark.
Monitoring Strategies
Azure Monitor can help catch over-provisioned disks before they become a chronic problem. Set up alerts using the Azure Monitor Agent's guest OS performance counters:
\\LogicalDisk(*)\\% Free Space— alerts when free space exceeds a threshold (flagging underused volumes)\\LogicalDisk(*)\\Free Megabytes— useful for absolute-size thresholds
Configure a data collection rule to route these counters to the Perf table in Log Analytics, then set alert rules for volumes consistently running below 40% utilization. That's your rightsizing candidate list.
Scaling Beyond Manual Fixes
For teams managing storage across many VMs or multiple subscriptions, one-off resize projects don't scale. Each disk reduction requires careful sequencing, validation, and cleanup — and the process starts over every time a new disk drifts into over-provisioning.
Lucidity's AutoScaler handles this automatically across your entire Azure environment. It continuously monitors disk utilization and autonomously shrinks underutilized volumes with zero downtime — no manual scripting, no VM deallocation, no one-off projects required.
Enterprises using Lucidity have improved average disk utilization from 30% to 75%, with customers like Dometic cutting cloud storage spend by 52%. Lucidity's free Storage Assessment can identify rightsizing opportunities in your Azure environment down to the individual volume.
Frequently Asked Questions
Can Azure disk size be reduced?
Not natively. The Azure portal, CLI, and PowerShell only support increasing disk size. The workarounds are: create a smaller disk and copy data (data disks), or modify the VHD footer via a community PowerShell script and swap the managed disk (OS disks).
What is the minimum size of an Azure managed disk?
The smallest available tiers are 4 GB for Premium SSD v1 (P1) and Standard SSD (E1). Standard HDD starts at 32 GB (S4). Most production workloads use 32 GB or above. Verify current tier sizes on the Azure Managed Disks pricing page.
Does shrinking an Azure disk cause data loss?
Not if the steps are followed correctly: shrink the in-guest partition first, copy data fully, verify integrity, then delete the original disk only after validation. Skipping the partition shrink or deleting the source disk too early are the two most common causes of permanent data loss.
Do I need to deallocate the VM to shrink the disk?
For the OS disk swap method, the VM must reach Stopped (deallocated) status, not merely shut down from within the OS. For the data disk copy method, deallocation is not required, but stop all services accessing the source disk during the copy.
Can I shrink the OS disk in Azure, or only data disks?
Both can be reduced. Data disks use the simpler create-and-copy method. OS disks require modifying the VHD footer and swapping the managed disk using a PowerShell script, which is a more involved process with more failure points.
How long does the process take?
The data disk method varies by VM SKU and disk type: robocopy and rsync on large volumes can take several hours. The OS disk PowerShell method typically runs 30 minutes to a few hours, depending on disk size and storage account region.