The mechanics make this worse. Azure managed disks charge for provisioned capacity, not actual data. Provision a 1 TB Premium SSD for a workload that only uses 200 GB, and you're paying for the full terabyte every month — whether the space is used or not.
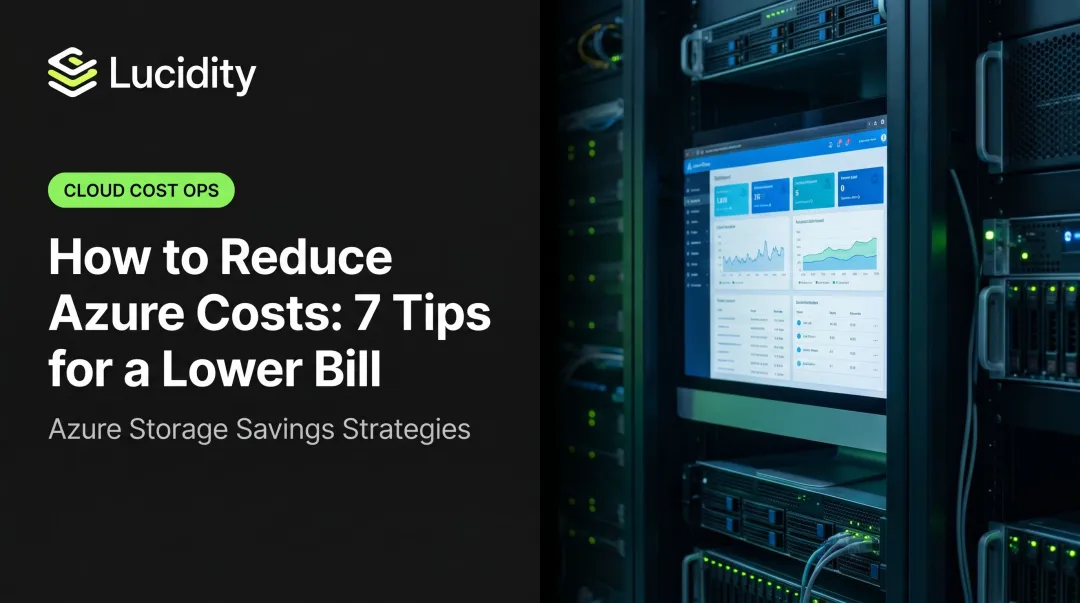
Azure VM storage isn't inherently expensive. It becomes expensive through three compounding factors: provisioning decisions that lock in the wrong tier or size, infrequent audits that leave idle disks running, and infrastructure choices that multiply costs across redundancy and egress. This article covers all three.
Key Takeaways
- Azure bills for provisioned disk size, not actual usage — over-provisioned disks waste money silently
- Biggest cost drivers: idle/unattached disks, wrong disk tiers, and redundancy settings that exceed actual needs
- Right-sizing and matching disk type to workload I/O are the highest-impact decisions at provisioning time
- Ongoing savings come from deleting orphaned disks, downtiering snapshots, and acting on Azure Advisor recommendations
- Automating disk monitoring reduces storage spend reliably — manual audits catch too little, too late
How Azure VM Storage Costs Build Up
Azure managed disk billing is flat and provisioned-based. Microsoft confirms that charges are prorated hourly at the same rate regardless of how much data the disk actually holds — a newly attached empty disk and a full disk of the same size cost exactly the same.
Costs build up at specific moments and then compound:
- A team provisions for safety margin — a 1 TB Premium SSD gets assigned to a workload that consistently uses 200 GB. No alarm fires, and no one notices.
- The disk never gets reviewed — Azure doesn't natively support direct disk shrinking, so downsizing requires creating a smaller disk, migrating data, and swapping attachments. The operational friction means it rarely happens.
- Additional cost layers accumulate on top — transaction fees on Standard disks, snapshot storage from forgotten backups, and redundancy multipliers all compound on top of base capacity charges.
By the time a cost review is triggered, the damage is already done — often 12–18 months of avoidable spend across dozens of disks. The sections below cover where those dollars go and how to systematically take them back.
Key Cost Drivers for Azure VM Storage
Three factors drive the majority of Azure VM storage spend: disk tier selection, idle and orphaned disks, and snapshot redundancy. Understanding each one shows where cuts are available — and how large they can be.
Disk Tier Selection
Disk tier is the single largest variable in per-GB cost. Using official Azure East US LRS pricing:
| Disk Size | Premium SSD | Standard SSD | Standard HDD |
|-----------|-------------|--------------|--------------|
| 256 GiB | $34.56/mo | $19.20/mo | $11.33/mo |
| 512 GiB | $66.56/mo | $38.40/mo | $21.76/mo |
| 1 TiB | $122.88/mo | $76.80/mo | $40.96/mo |
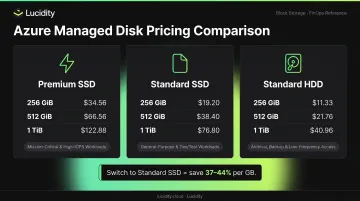
Premium SSD runs 1.6–1.8x the cost of Standard SSD, and roughly 3x the cost of Standard HDD at comparable sizes. Switching a non-critical workload from Premium to Standard SSD saves 37–44% per GB depending on size tier — with no performance impact if the workload doesn't actually require high IOPS.
Idle and Orphaned Disks
When a VM is deleted, its attached disks are not deleted by default. Microsoft explicitly states that users continue paying for those unattached disks indefinitely.
Idle disk waste spans four categories worth auditing:
- Unattached disks — no VM association, still billing
- Reserved-but-unused capacity — allocated but serving no workload
- Unmounted volumes — attached to a VM but inaccessible to the OS
- Zero-I/O disks — attached, mounted, but receiving no read/write activity
Lucidity's Lumen product identifies all four categories in real time, surfacing idle disks that don't appear in native Azure dashboards. Based on Lucidity's analysis of over 100 PB of enterprise storage, these four categories together can represent **up to 70% of unused block storage spend**.
Idle disks are only part of the picture. Snapshot accumulation creates a separate — and often overlooked — cost layer.
Snapshot and Redundancy Costs
Snapshot billing surprises many teams. Per official Azure pricing:
- Standard snapshot: $0.05/GB-month
- Premium SSD snapshot (LRS): $0.12/GB-month — 2.4x higher
- Premium SSD snapshot (ZRS): $0.18/GB-month — 3.6x higher
Azure Advisor recommends converting managed disk snapshots to Standard storage. This single change can reduce snapshot costs by 60% — making it one of the quickest wins available before touching any disk configuration.
Cost-Reduction Strategies for Azure VM Storage
Strategies fall into three groups: decisions made at provisioning time, how disks are managed during their lifecycle, and the broader infrastructure context.
Strategies That Change Provisioning Decisions
Match disk type to actual workload I/O requirements. The Azure Well-Architected Framework is clear: reserve Premium SSD for latency-sensitive, high-IOPS workloads like production databases. Standard SSD covers general-purpose workloads — web servers, dev environments, moderate-throughput applications — at 37–44% lower cost. Standard HDD works for backups and non-production scenarios.
Right-size capacity at provisioning. Because Azure charges for full provisioned capacity, a 1 TB disk at 25% utilization wastes 75% of its monthly cost. Provision closer to actual need. Plan for expansion when genuinely required — not speculatively.
Commit to Reserved Capacity for stable workloads. Azure Disk Storage reservations apply to select Premium SSD SKUs (P30–P80) for 1-year terms in a specific region. Reserved Capacity delivers meaningful discounts over pay-as-you-go for disks that won't change size over the commitment period. Check current portal pricing for your specific SKU and region before committing — discount levels vary.
Use Azure Spot VMs for interruptible non-production workloads. One important caveat: if the Spot VM eviction policy is set to Deallocate, storage costs for the underlying disks continue after eviction. Set the policy to Delete to remove the VM and its disks together — otherwise Spot VMs create orphaned disk costs instead of eliminating them.
Strategies That Change How Disks Are Managed
Systematically audit for idle disks across all four categories. In the Azure portal, filter Managed Disks by Disk state = Unattached to find the first category. For scripted cleanup, look for disks where ManagedBy == null using Azure CLI.
The other three categories — reserved-but-unused, unmounted volumes, and zero-I/O disks — require more detailed monitoring to surface. This is where Lucidity Lumen provides detection that native Azure dashboards miss.
Right-size over-provisioned active disks. Azure Monitor and Azure Advisor both surface disk utilization metrics. Disks consistently running below 50% of provisioned capacity are candidates for downsizing. The process requires:
- Create a smaller replacement disk
- Copy data using Robocopy (Windows) or equivalent
- Verify the transfer is complete
- Detach the original disk and attach the new one
- Delete the original after confirming the workload runs correctly
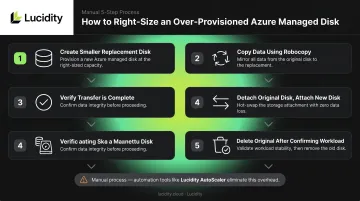
This manual process explains why over-provisioning persists. Lucidity AutoScaler handles disk shrinking autonomously across Azure environments with zero downtime, bypassing the native limitation.
Convert Premium SSD snapshots to Standard storage. Snapshots used for backup don't need Premium performance characteristics. At $0.05/GB versus $0.12/GB, the switch to Standard snapshot storage saves 60% on backup storage costs. For teams with large snapshot libraries, this saving multiplies fast across hundreds or thousands of snapshots.
Act on Azure Advisor cost recommendations. Navigate to Advisor → Cost in the Azure portal. Advisor surfaces disk-level recommendations including unattached disks, snapshot tier conversions, and VM right-sizing candidates.
Current Advisor criteria for VM shutdown recommendations use the last 7 days of data, flagging VMs where P95 max CPU across cores is under 3% and outbound network utilization is under 2%. These thresholds are conservative — a flagged VM is a strong signal, not a false positive.
Strategies That Change the Infrastructure Context
Three infrastructure-level changes can significantly reduce ongoing costs:
- Right-size redundancy settings. GRS and RA-GRS replicate data across regions at meaningfully higher cost than LRS. For non-critical or dev workloads, switching to LRS cuts redundancy overhead without impacting availability.
- Co-locate VMs and storage in the same Azure region. Cross-region movement incurs egress charges on top of disk costs — $0.02/GB intra-continental, $0.05/GB inter-continental. Review architecture diagrams for cross-region dependencies that can collapse into a single region.
- Use VM Scale Sets for variable-demand workloads. When scale-in deletes instances rather than deallocating them, associated disks are removed along with the VM — reducing the persistent disk footprint proportionally. This requires the eviction policy set to Delete, not Deallocate.
Conclusion
Reducing Azure VM storage costs requires knowing where the cost actually originates. Over-provisioned tiers and sizes set the cost floor at provisioning. Idle disks and unreviewed snapshots drain budgets during operation. Redundancy settings, egress charges, and architecture decisions multiply everything else.
None of these cost drivers has a single fix. Teams that consistently hold storage spend down address all three layers: they run regular audit cycles, act on Azure Advisor recommendations, and invest in automation that surfaces waste faster than manual portal reviews.
Lucidity's free Assessment tool analyzes your Azure storage environment in under five minutes (no agents, no infrastructure changes required) and surfaces utilization, waste, and potential savings down to the volume level. It's the fastest way to find out exactly what your storage is costing you — and what you can reclaim.
Frequently Asked Questions
What is the most common reason Azure VM storage costs are higher than expected?
The most common cause is paying for provisioned disk capacity that far exceeds actual usage. Azure charges for the full provisioned size regardless of how much data the disk holds. Over-provisioned disks from past deployments rarely get reviewed because shrinking them requires a manual, multi-step process most teams never prioritize.
How do I find unattached Azure managed disks that are still incurring charges?
In the Azure portal, navigate to Disks and filter by Disk state = Unattached. Via CLI, query for disks where managedBy == null. Lucidity Lumen automates this across all four idle disk categories — unattached, reserved, unmounted, and zero-I/O — without manual portal work.
Should I use Premium SSD or Standard SSD to reduce Azure VM storage costs?
Base the decision on workload I/O requirements. Premium SSD is justified for high-IOPS, latency-sensitive production workloads like databases. Standard SSD is more cost-effective for general-purpose workloads and saves 37–44% per GB compared to Premium. Standard HDD suits backup or dev/test scenarios where performance isn't a constraint.
What is Azure Reserved Capacity for disk storage and when does it make sense?
Reserved Capacity is a 1-year commitment to specific Premium SSD SKUs (P30–P80) in a fixed region, in exchange for discounted pricing versus pay-as-you-go. It only makes financial sense for predictable, stable workloads where provisioned disk size is unlikely to change over the commitment period.
Can I shrink or downsize an Azure managed disk without losing data?
Azure does not support direct disk shrinking. The supported approach is to create a smaller disk, copy data using Robocopy or equivalent tooling, verify the transfer, then detach and delete the original. The operational overhead is significant enough that most teams defer it indefinitely, which is why over-provisioned disks accumulate over time.
How do I know if I'm over-provisioning Azure VM storage?
Azure Monitor and Azure Advisor both surface disk utilization metrics. A disk consistently running below 40–50% of provisioned capacity, or a VM showing low CPU and network activity over 7+ days, is a strong signal that the current tier and size should be reviewed. Lucidity's free Assessment tool also surfaces this at the portfolio level in minutes.