This guide covers everything you need: prerequisites, step-by-step creation across all four supported methods (Portal, CLI, PowerShell, ARM Template), the restrictions that catch teams off guard, and the most common mistakes worth avoiding.
Key Takeaways
- Incremental snapshots store only delta changes since the last snapshot — the first one is always a full copy
- Billed for used storage only; always stored on Standard HDD regardless of parent disk type
- Default to ZRS in supported regions; four creation methods available: Azure Portal, CLI, PowerShell, and ARM Templates
- Hard limits: 500 incremental snapshots per disk at any time; up to 7 snapshots per disk every 5 minutes
- Premium SSD v2 and Ultra Disk snapshots require a background copy process to complete before use
What Are Azure Managed Disk Incremental Snapshots?
An incremental snapshot is a point-in-time backup of a managed disk that stores only the changes since the last snapshot. The first incremental snapshot you take is always a full copy of the disk's used data. Every subsequent snapshot captures only the delta — what actually changed between that point and the previous snapshot.
How They Differ from Full Snapshots
| Property | Incremental Snapshot | Full Snapshot |
|---|---|---|
| Storage tier | Always Standard HDD | Can use Premium SSD |
| Billing basis | Used size (delta changes) | Full provisioned disk size |
| Redundancy default | ZRS (where available), otherwise LRS | LRS |
| Creation speed | Faster after first snapshot | Slower — full copy each time |
Even if your parent disk is a Premium SSD, the incremental snapshot is stored on Standard HDD. Azure designed it this way to keep incremental snapshots cost-efficient for ongoing backup workflows.

Why the Differential Capability Matters
That delta-only billing has a direct impact on cross-region backup costs. When copying a snapshot to another region, Azure transfers only the changed blocks — not the full disk — cutting both transfer time and egress costs on large or frequently snapshotted volumes.
What You Need Before Creating an Incremental Snapshot
Access and Tool Requirements
- Active Azure subscription with the target managed disk already provisioned
- RBAC permissions: Disk Snapshot Contributor role (for backup vault scenarios) or Contributor role on the resource group
- Azure CLI: Latest version installed and authenticated (
az login) - PowerShell: Az module installed (
Install-Module -Name Az) and connected (Connect-AzAccount)
Disk Details You'll Need
Gather these details before proceeding:
- Disk name and the resource group it belongs to
- Subscription ID (snapshots must stay within the same subscription as the source disk)
- Target location for the snapshot
- The disk's resource ID (retrieve via
az disk showor from the portal's Properties blade)
Pre-Creation Checks
Run through these before proceeding:
- Snapshot quota: Confirm you haven't hit the 500-snapshot limit for that disk (
az snapshot listfiltered by source disk ID) - Disk resize status: Avoid snapshotting a disk mid-resize across the 4TB boundary, as this breaks differential capability between pre- and post-resize snapshots
- Premium SSD v2 / Ultra Disk: Verify no more than 3 snapshots are pending background copy simultaneously for these disk types
How to Create Azure Managed Disk Incremental Snapshots
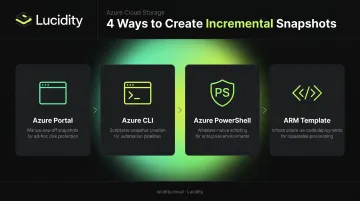
Azure supports four methods for creating incremental snapshots, each suited to different workflows:
- Azure Portal — fastest option for one-off, manual snapshots
- Azure CLI — ideal for scripting and Linux/bash-native automation
- Azure PowerShell — best for Windows environments and PowerShell-first teams
- ARM Templates — right choice when snapshots are part of infrastructure-as-code deployments
Azure Portal
The portal is the fastest path for one-off snapshots:
- Sign in to the Azure Portal and navigate to Disks
- Select the target managed disk
- Click Create Snapshot
- Enter a snapshot name and select the resource group
- Under Snapshot type, choose Incremental
- Click Review + Create, then Create
The portal does not support recurring snapshot scheduling natively. For automated or policy-driven snapshots, use CLI or PowerShell with Azure Automation, or use Azure Disk Backup directly.
Azure CLI
The core command for incremental snapshot creation:
# Get the disk resource ID
diskId=$(az disk show \
  -g $resourceGroupName \
  -n $diskName \
  --query [id] -o tsv)

# Create the incremental snapshot
az snapshot create \
  -g $resourceGroupName \
  -n $snapshotName \
  --source $diskId \
  --incremental true
To list existing incremental snapshots for a specific disk and verify creation:
az snapshot list \
  --query "[?creationData.sourceResourceId=='$diskId' && incremental]" \
  -g $resourceGroupName \
  --output table
Azure PowerShell
For PowerShell-native environments or Windows-based automation pipelines, use New-AzSnapshotConfig to build the configuration object, then pass it to New-AzSnapshot:
# Get the source disk
$disk = Get-AzDisk -ResourceGroupName $resourceGroupName -DiskName $diskName

# Build snapshot config
$snapshotConfig = New-AzSnapshotConfig `
  -SourceUri $disk.Id `
  -Location $location `
  -CreateOption Copy `
  -Incremental

# Create the snapshot
New-AzSnapshot `
  -ResourceGroupName $resourceGroupName `
  -SnapshotName $snapshotName `
  -Snapshot $snapshotConfig
To identify snapshots belonging to the same disk family, filter by both SourceResourceId and SourceUniqueId. If a disk is deleted and recreated with the same name, its UniqueId changes — so using both properties together reliably identifies the snapshot chain even across disk replacements.
ARM Template
For Infrastructure as Code workflows, define the snapshot resource as follows:
{
  "type": "Microsoft.Compute/snapshots",
  "apiVersion": "2022-03-02",
  "name": "[parameters('snapshotName')]",
  "location": "[parameters('location')]",
  "properties": {
    "creationData": {
      "createOption": "Copy",
      "sourceResourceId": "[resourceId('Microsoft.Compute/disks', parameters('diskName'))]"
    },
    "incremental": true
  }
}
Use ARM Templates when snapshot creation needs to be part of a broader deployment — CI/CD pipelines, repeatable environment provisioning, or any setup where infrastructure is version-controlled. This keeps snapshots consistent with the rest of your deployment state, rather than managed separately as a manual afterthought.
Key Restrictions and Parameters That Affect Your Snapshots
Quota and Rate Limits
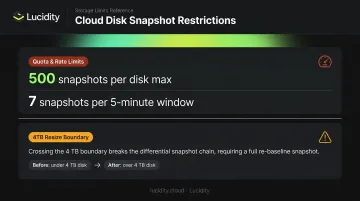
According to Microsoft's documentation, two hard limits apply to all incremental snapshots:
- 500 snapshots per disk at any given time (not a lifetime limit — deleting older snapshots frees quota)
- 7 snapshots per 5-minute window per disk
Hitting the 500-snapshot ceiling blocks all new snapshot creation for that disk. There's no grace period or override — older snapshots must be deleted first.
The 4TB Resize Boundary
Resizing a parent disk across the 4TB boundary between snapshots breaks the differential chain. Pre-resize and post-resize snapshots cannot be compared for delta changes. If you need to resize across this boundary, take a final incremental snapshot immediately before resizing, then treat the first post-resize snapshot as a new baseline.
Premium SSD v2 and Ultra Disk Background Copy
Snapshots of these disk types go through a background copy process after creation. You cannot use them — for disk creation or SAS URI generation — until CompletionPercent reaches 100.
Check completion status:
# CLI
az snapshot show \
  -n $snapshotName \
  -g $resourceGroupName \
  --query [completionPercent] -o tsv
# PowerShell
$snapshot = Get-AzSnapshot -ResourceGroupName $resourceGroupName -SnapshotName $snapshotName
$snapshot.CompletionPercent
Up to 3 snapshots can be pending background copy simultaneously for these disk types.
Cost and Storage Mechanics
Background copy behavior aside, understanding how snapshots are billed matters just as much as knowing their technical limits.
- Billed for the used size of delta changes, not the provisioned disk size
- Always stored on Standard HDD pricing, regardless of parent disk type
- Daily billing formula:
used GiB ÷ days in billing month = daily consumed quantity
For teams managing large snapshot volumes across many disks, costs accumulate fast — particularly when disks have minimal data changes between snapshots. Lucidity shows exactly how much data is on each disk versus its provisioned size, so you can decide whether frequent snapshotting is justified before the bill reflects it.
Common Mistakes and How to Fix Them
These four mistakes account for the majority of failed snapshot operations and recovery failures in Azure environments. Knowing them before they hit your pipeline saves significant debugging time.
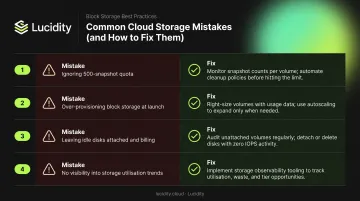
Mistake 1: Not checking the 500-snapshot quota before creating new snapshots
When the quota is hit, new snapshot creation silently fails — often without a clear error message for teams unfamiliar with the limit. Before automating snapshot creation, run az snapshot list filtered by source disk and count active snapshots. Implement a lifecycle policy to delete snapshots outside your retention window.
Mistake 2: Using a Premium SSD v2 or Ultra Disk snapshot before background copy completes
Creating a disk from a snapshot with CompletionPercent below 100 returns an error. Query CompletionPercent first and wait for 100 before proceeding with restore or SAS URI generation.
Mistake 3: Resizing across the 4TB boundary without accounting for the differential chain
Pre- and post-resize snapshots are not differentially linked. If a resize is planned, take a final incremental snapshot before resizing, then start a new snapshot chain from the post-resize state.
Mistake 4: Trying to move snapshots between subscriptions for disaster recovery
Incremental snapshots cannot be moved between subscriptions — only copied. Use the cross-region copy workflow:
az snapshot create \
  -g $targetResourceGroup \
  -n $targetSnapshotName \
  -l $targetRegion \
  --source $sourceSnapshotId \
  --incremental \
  --copy-start
This transfers only changed blocks, not the full disk.
When to Use Incremental Snapshots vs. Full Snapshots or Azure Disk Backup
Choosing the right tool depends on what you're protecting and how much control you want over the process.
Use incremental snapshots when:
- You need frequent, cost-efficient point-in-time recovery for individual managed disks
- You're running pre-deployment backups (before patching, OS updates, or application releases)
- You want to build a custom backup workflow with precise control over retention and scheduling
Use Azure Disk Backup when:
- You need automated lifecycle management with policy-driven retention
- You require multiple backups per day without managing custom scripts
- Centralized governance via Backup Center is a requirement
Full snapshots remain relevant only if your use case specifically requires Premium SSD-compatible snapshot storage — though Microsoft recommends Azure Compute Gallery for VM image scaling scenarios instead.
One hard limit applies regardless of which approach you choose: incremental snapshots are disk-level backups. They don't capture VM configuration, networking settings, or application state. For application-consistent recovery or full VM restoration, pair Azure VM Backup with disk snapshots rather than relying on snapshots alone.
Frequently Asked Questions
What is the difference between incremental and full snapshots in Azure?
Full snapshots copy the entire provisioned disk size each time they're created. Incremental snapshots store only the changes since the last snapshot, making them significantly cheaper for ongoing backup. The first incremental snapshot is always a full copy; all subsequent ones capture only deltas.
How much do Azure managed disk incremental snapshots cost?
Incremental snapshots are billed on used delta storage only, not the full provisioned disk size, at Standard HDD rates regardless of the parent disk type. The daily consumed quantity equals used GiB ÷ days in the billing month, visible in your Azure usage report.
Can I move an Azure incremental snapshot to a different subscription?
No — incremental snapshots cannot be moved between subscriptions. They can be copied to another resource group or region using az snapshot create with the --source flag pointing to the existing snapshot resource ID. This is the recommended approach for cross-region disaster recovery.
How many incremental snapshots can I create per disk?
Azure allows up to 500 incremental snapshots per disk at any given time, with a creation rate limit of 7 per 5-minute window. This is not a lifetime cap — deleting older snapshots frees up quota for new ones.
Can I take incremental snapshots of a running VM disk?
Yes — incremental snapshots can be taken while a disk is attached to a running VM, but they are crash-consistent, not application-consistent. For application-consistent backups, use Azure VM Backup or application-level quiescing alongside snapshots.
How do I restore a disk from an incremental snapshot?
Run az disk create --source $snapshotId (CLI) or New-AzDisk (PowerShell) with the snapshot as the source, then attach the new disk to a VM. For Premium SSD v2 or Ultra Disk snapshots, wait for CompletionPercent to reach 100 before the disk is fully performant.